Tmux How-To
- Robert Urban
- Bruno Miretti (Deactivated)
Introduction
tmux stand for "terminal multiplexer" and makes it possible to run programs in one or more sessions (called "windows" in tmux terminology) provided by the tmux server process. tmux uses a client/server architecture. This means the user connects to a tmux server which manages the running terminal windows. The user can "detach" from the tmux server and reconnect again. Should the user lose the network connection to the system where the tmux server is running, the tmux terminal windows are unaffected, thus protecting running programs from unwanted disconnections, for example due to an unreliable network.
How tmux Works
When executed without any parameters, the tmux program creates a new tmux session (by default named "0" for the first session, "1" for the second, etc) with one terminal window, and starts "bash" in the terminal window.
The following shows the relationship of the various components:
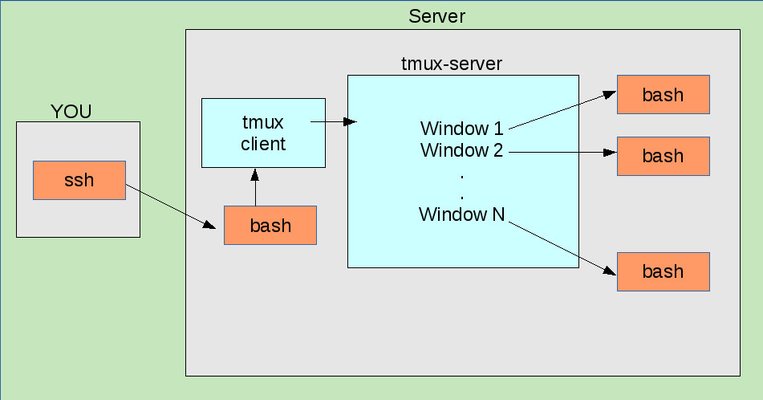
If the connection between YOU and Server fails, only the initial bash instance and the tmux client are terminated. the tmux server is unaffected and all the programs running under its control continue to run.
Installation
Fedora/Redhat
# yum install tmux |
Using tmux
tmux on the Command Line
tmux accepts many parameters on the command line. The examples below are a small subset of these. For a comprehensive list, see the tmux man-page "man tmux".
The following command creates a new tmux session and names the session <session-name>.
$ tmux new-session -s <session-name> |
The following lists existing tmux sessions:
|
The following attaches your terminal to a tmux session named Gilligan:
$ tmux attach-session -t Gilligan |
Interaction with tmux From Within tmux
tmux can be issued commands from within a tmux session, using an "escape sequence". A tmux escape sequence always begins with Control-B. This means holding the "Control" key down and pressing the "b" key once, and then releasing the "Control" key. This will be abbreviated below with "C-b". Typically, a single key follows the "C-b" key, such as "c", which creates a new "window", or interactive session or "window" under the control of the tmux server. This sequence is produced by generating "C-b" as above, and then pressing the "c" key.
"C-b c" Creates a new window.
"C-b n" selects the Next window, if there is more than one.
"C-b p" selects the Previous window, if there is more than one.
"C-b d" Detaches your terminal from the tmux server, but leaves the tmux server running.
There are many more commands in addition to those above. Also, from within a tmux session tmux command-line directives can be used which perform the same action as the escape sequences above. Thus, "tmux new-window" does the same as "C-b c", "tmux next-window" is the same as "C-b n", "tmux previous-window" is the same as "C-b p", and "tmux detach-client" is the same as "C-b d".
The Scroll Buffer
When you start tmux you will notice that you can no longer use the scrollbar in your terminal emulator window to scroll the previous windows contents into view. This is because tmux has taken over the management of the scoll-buffer, and therefor puts the terminal emulator in non-scrolling mode.
To scroll back, you must put tmux in copy mode.
"C-b [" puts tmux in copy mode, during which you can use the navigation keys (Up/Down/Left/Right-Arrow, Page-Up/Down) to move around in the scroll buffer.
"C-b Page-Up" puts tmux in copy mode and scrolls up one page.
"q" ends copy mode.
copy mode also offers copy and paste functions. See one of the references at the bottom for more information.
tmux Status Bar
By default tmux displays a status bar at the bottom of a tmux session in the form:
[<session-name>] <window-number>:<user>@<hostname>:<current-directory> "<hostname>" HH:MM DD-Mmm-YY
Here an example:

The session-name is "Ringo", the window-number is "0", the username is "root", the hostname is "fileserver.stromasys.com", and the current directory is "~", which means the login directory.
Short Exercise
The follosing is a short exercise to get to know tmux.
On a Linux system with tmux installed:
- Run the command "
tmux new-session -s practice". - At the new bash prompt in the newly created window, run the following bash one-liner:
- while true; do date; sleep 5; done
- Note how the above one-liner displays the time every 5 seconds.
- Create a new window with "C-b c".
- Display a listing of the /etc directory with "
ls /etc". - Switch to the previous window using "C-b p".
- Notice that the bash one-liner is still running.
- Detach from the tmux server with "C-b d".
- Notice that you are exactly where you were before you started tmux.
- Re-attach to the still running tmux server with "
tmux attach-session -t practice". - Notice that your bash one-liner is still running.
- Interrupt the one-liner using "Control-C".
- Exit from the window with "
exit<ENTER>". - Notice how tmux automatically switches to the next (and last) window under the tmux server's control.
- Exit from the window with "
exit<ENTER>". - Notice how the tmux server terminates when you close the last window and puts you back where you were before running tmux.
Tip of the Iceberg
tmux can do much more than this How-To describes. For example:
- Allow more than one client to connect to a tmux session, that is, allow several users to see the same interactive session from different computers.
- Divide the current terminal window veritcally and horizontally into so-called "panes" and show multiple tmux windows within these panes (instead of only one).
- Configure tmux such that it can start a session with windows and panes already set up.
References
- The manual page ("
man tmux") - The Tao of Tmux
- A Tmux Primer
- ArchLinux Tmux Page
Related articles
© Stromasys, 1999-2024 - All the information is provided on the best effort basis, and might be changed anytime without notice. Information provided does not mean Stromasys commitment to any features described.