Network Interface Management
- W.Erber
To add an additional network interface to an instance or to remove an interface from your instance perform the steps described below.
Please note:
- The steps below only provide a basic overview. The exact tasks required will vary depending on your network design. Please refer to the AWS documentation for details.
- The GUI may look slightly different depending on which version of the GUI you use. However, the available options should be the same.
Contents
When an instance is created, a default Ethernet interface is attached to the system. This is the primary network interface. You can create additional network interfaces and attach them to an instance.
Please note: If an instance has only one Ethernet interface, a public IP address can be assigned to the interface automatically. However, this automatically assigned address will be removed by AWS if a second interface is added to the instance and the instance is stopped and restarted. Be careful not to lose connectivity to your instance when changing the network configuration. Refer to the section about Elastic IP Addresses for additional information.
Creating a New Network Interface
The following steps are required to create a new network interface that can later be added to an instance:
| Step | Details |
|---|---|
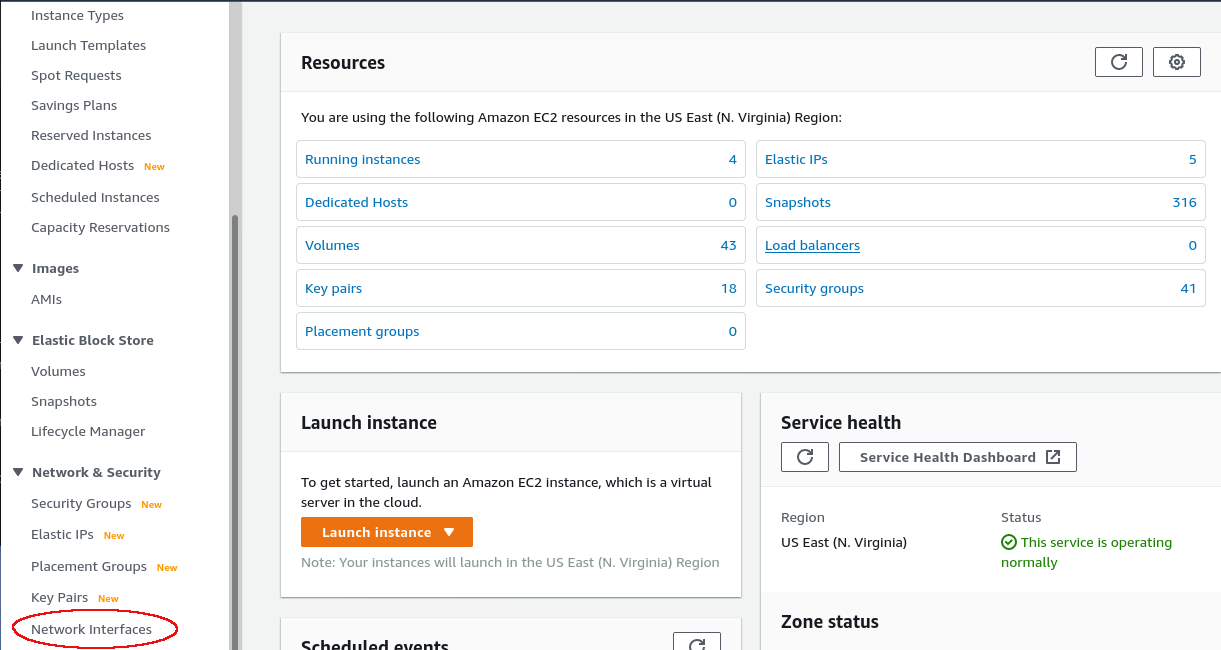
| Locate the Network Interfaces option on the EC2 dashboard and click on it. |
Clicking on Network Interfaces opens the list of existing network interfaces. |
| Step | Details |
|---|---|
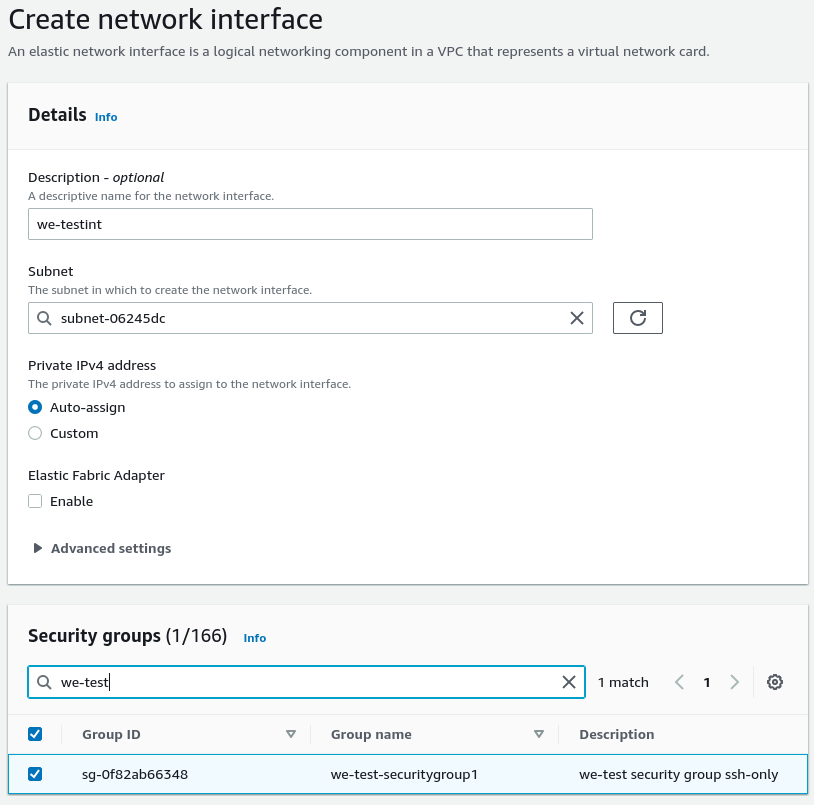
| Create a new interface. | Click on Create Network Interface at the top of the interface list.
|
This opens the interface creation window.
On this screen,
Click on Create when you are done. The new interface will appear in the overview list. There you can assign a name to the interface. Check that the interface is in state available. |

Attaching the Interface to your Instance
After creating a network interface, you have to assign it to the instance where it will be used.
Important information:
- Stopping and restarting the instance after adding a second network interface will release any automatically assigned public IP address. If several interfaces are required where one or more are configured with a public address, use Elastic IP addresses.
- Additionally, adding a second network interface with an IP configuration to a non-Amazon Linux EC2 instance causes traffic flow issues. This occurs in cases of asymmetric routing where traffic to the instance arrives at one network interface and leaves the instance through the other network interface. This is blocked by AWS because of a mismatch between MAC address and IP address. Refer to the AWS documentation and the Charon Cloud Networking Information chapter (section Asymmetric Routing Considerations) for more information. Failure to use the proper steps, may make your instance unreachable!
- If your instance supports enhanced networking there may be naming inconsistencies when adding additional interfaces to a running instance. Please refer to the interface naming section below and the AWS documentation.
- Charon-SSP specific: the NetworkManager is disabled on Charon-SSP AWS marketplace images that are based on Linux 7.x. Therefore, instances based on such images require manually created ifcfg-files in /etc/sysconfig/network-scripts to define the IP configuration for additional interfaces before the Charon Manager can be used to manage it.
Basic steps:
| Step | Details | |
|---|---|---|
| Locate your network interface in the interface list and right-click on it. | The right-click opens the context menu. Select Attach. This will open the window to enter the necessary instance information. | 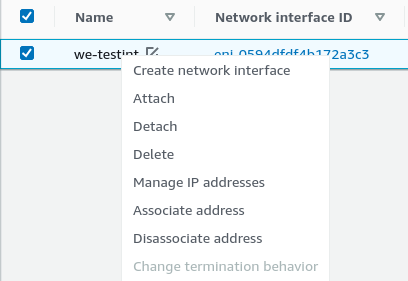 |
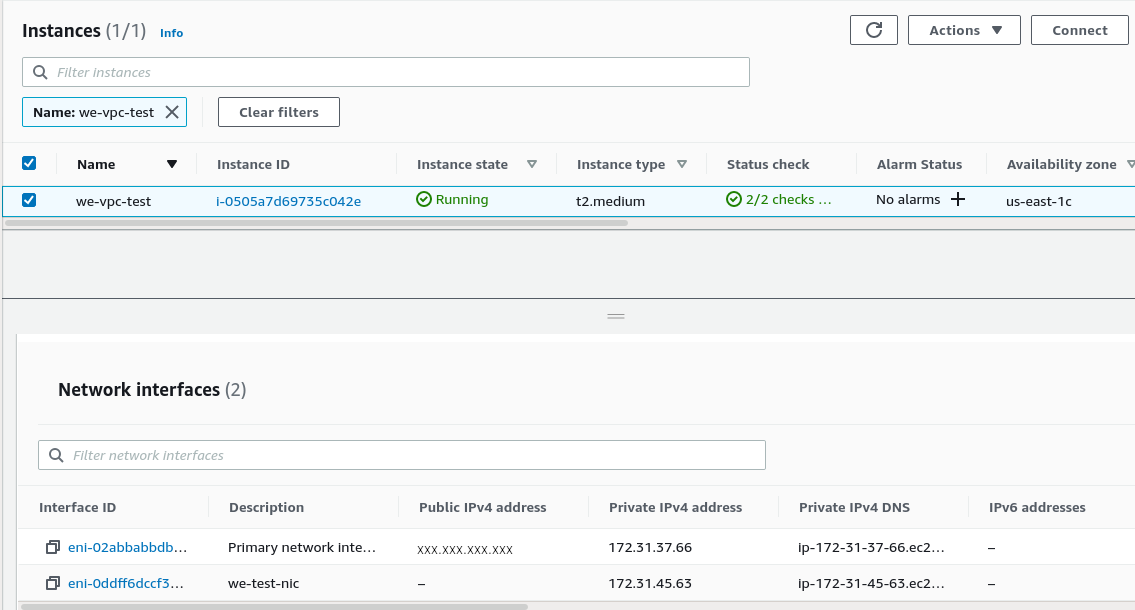
| Select your instance and confirm entry. | Select your instance from the drop-down list and click on Attach. The state of your interface will change from available to in-use. |  |
| Verify that your instance has a second interface. | Select your instance in the instance list. The networking tab in instance details should now display two network interfaces:
| |
You can also attach/detach existing interfaces from the instance overview screen. Select your instance and then Actions > Networking > Attach or Detach network interface.
Assigning an Elastic IP Address to the Network Interface
Please note:
- The public IP address assigned to your instance by default when it starts, is not persistent. You will receive a new address when the instance is stopped and started again. Also this address will be removed after adding a second interface to the instance and restarting the instance.
- An Elastic IP address is a persistent, public IPv4 address to be used for one of your network interfaces or instances. You can associate an Elastic IP address with any instance or network interface in your account.
- The advantage of associating the Elastic IP address with the network interface instead of directly with the instance is that you can move the network interface with its attributes easily from one instance to another.
- The initial automatically assigned public IP address will be removed as soon as you restart the instance after adding a network interface with an Elastic IP address to your instance. Do not restart your instance before you are sure you can reach it via the Elastic IP address. The automatically assigned public IP address will also be disabled if you assign an Elastic IP address to the primary Ethernet interface of the instance.
The table below describes the steps required to add an Elastic IP address to a network interface.
| Step | Details |
|---|---|
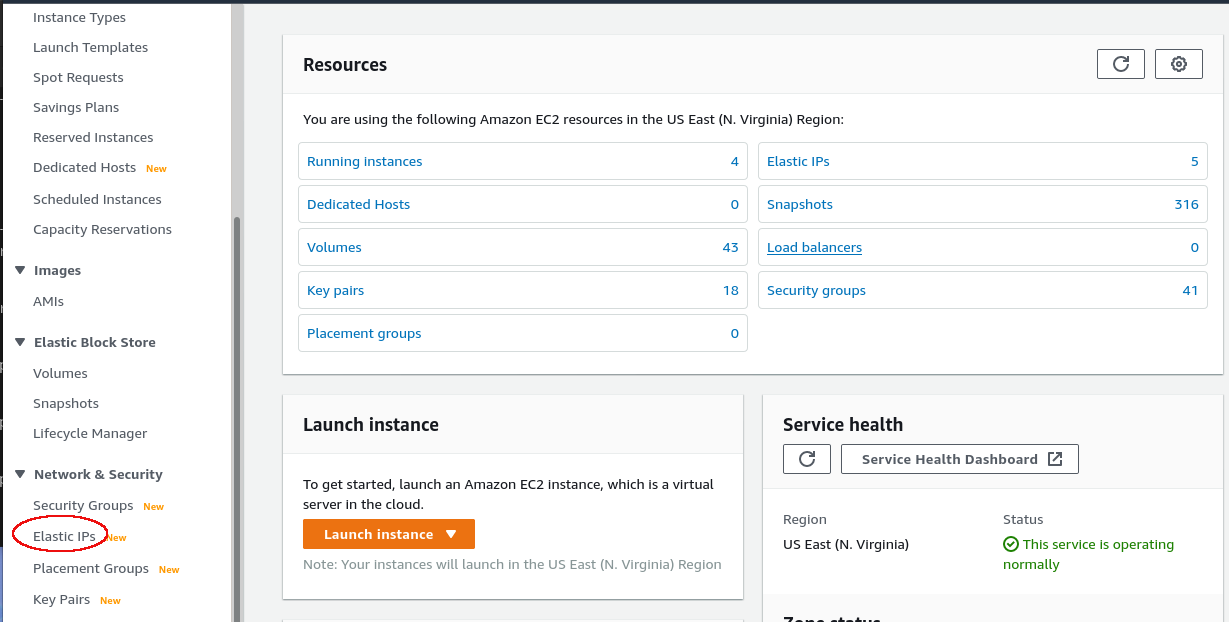
| Locate the Elastic IPs option on the EC2 dashboard and click on it. |
This will list the already created Elastic IP addresses. |
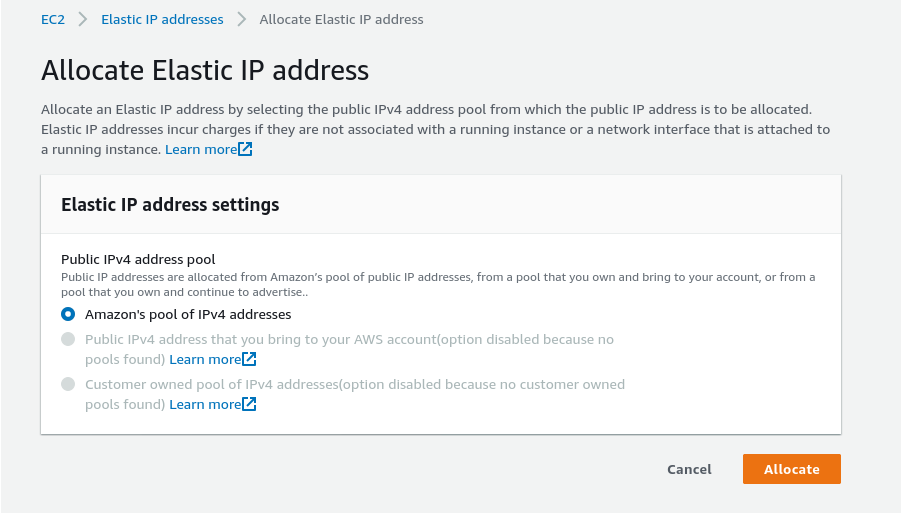
| Allocate a new Elastic IP address. | In the overview list, click on Allocate Elastic IP address if you need to allocate a new address. It is also possible to assign an existing address to an interface. However, each address can only be used for one instance.
This will open the address allocation window. |
In the address allocation window, select the Amazon pool (or your own pool of public addresses), and click on Allocate.
The new address will be shown in the list. | |
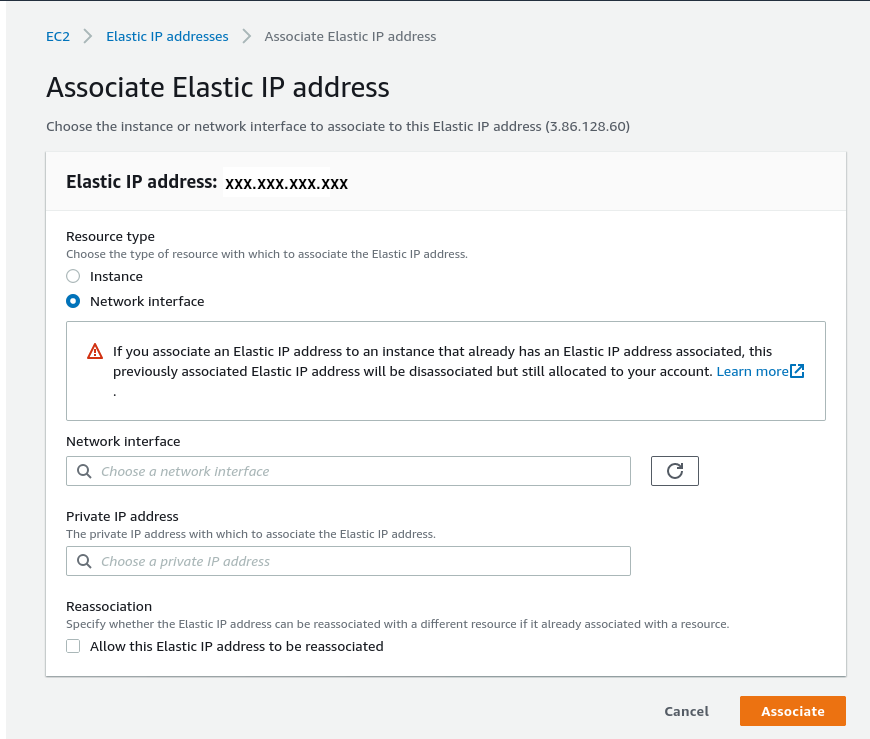
| Associate the address with the network interface. | Select the address. Then select Actions > Associate Elastic IP address. A window to enter the required options opens.
In the window,
|

Detaching a Network Interface from an Instance
You can detach a network interface from your instance in two ways:
- Select your instance in the instance list and use the menu Actions > Networking > Detach Network Interface. Or,
- Select your network interface in the network interface list and use the menu Actions > Detach.
Take care that this step will not make your instance unreachable.
Please note: the primary network interface cannot be detached.
Interface Naming on Linux Hosts with Enhanced Networking
On instances without support for enhanced networking the Linux interface names are usually eth0, eth1, etc.
However, on instances with support for enhanced networking, there may be a naming inconsistency after adding a second interface to the instance:
- The first (primary) interface is called ensX (where X is an integer denoting the interface number; example: ens5).
- When a second interface is added to a running instance, it may initially be called eth0.
However, the commandethtool -i eth0shows that the enhanced network driver (ena) will be used for this interface. This interface will change its name to ensY (where Y is X+1) after restarting the instance. This means that any configuration file created for this interface must use the final name of the interface instead of eth0. Otherwise, the instance may become unreachable after a restart because there is no valid interface configuration (the NetworkManager is not enabled on Charon-SSP AWS marketplace images based on Linux 7.x, so a configuration file must exist to configure the interface properly).
Please note: this numbering sequence may change in the future. It is based on the PCI slot on which the Ethernet controller is presented and which is incremented by one for each additional Ethernet interface added. On the Charon host system, the slot can be verified with the following command:# lspci -vv | grep -A20 Ethernet
To avoid confusion before the instance can be restarted, the new interface can be renamed to its final name using the command
ip link set eth0 name ensY && ip link set ensY up
Address Assignment Information
Each VPC is assigned a block of private IP addresses. This block can be split by the user to form several IP subnets. Routing between such subnets is automatically enabled.
When an E2C instance is launched into the default VPC and a public subnet, the default behavior is as follows:
- If the instance has only one network interface, it is automatically assigned a private IP address from the address range assigned to the public subnet and a public IP address. This network interface is the primary network interface. It is called eth0 on the AWS level (please refer to the interface naming section to learn about the interface names presented to the operating system).
- If the instance has more than one network interface, it is automatically assigned a private IP address for each of the network interfaces - but no public IP address.
The default behavior can be modified, for example:
- Manually assigning a private IP address from the subnet range.
- Enabling or disabling the automatic assignment of a private IP address to deviate from the subnet setting.
- Manually assigning a public IP address from the AWS range or the customer range.
Please note: Public IP addresses are not directly visible to the instance. The instance operating system always works with the private address. For external connections, the private address is mapped to the public IP address via NAT.
Reserved addresses (important, if manual address assignment is used):
The following address range is reserved to allow AWS to query meta-data about instance configuration: 169.254.0.0/16. This range is automatically configured on every network interface.
The following addresses are reserved in each subnet and cannot be used for E2C instances (shown in the example below for network 10.1.1.0/24):
- 10.1.1.0: the network address
- 10.1.1.1: reserved by AWS for the VPC router
- 10.1.1.2: reserved by AWS in any subnet; the second host address in the base VPC network range is the DNS server for the VPC.
- 10.1.1.3: reserved by AWS for future use
- 10.1.1.255: network broadcast address; AWS networks do not use broadcasts.
Please note: An automatically assigned public IP address is released (and not re-assigned) by AWS for example if
- a second interface is added to the instance and the instance is then stopped and restarted,
- an Elastic IP is associated with the instance,
- an Elastic IP address is associated with the primary interface of the instance.
See https://docs.aws.amazon.com/AWSEC2/latest/UserGuide/using-instance-addressing.html for details.
Please note: An automatically assigned public IP address is not persistent. Every time an instance starts, it is assigned a new public IP address. If persistent public addresses are needed, use Elastic IP addresses.
Related content
© Stromasys, 1999-2024 - All the information is provided on the best effort basis, and might be changed anytime without notice. Information provided does not mean Stromasys commitment to any features described.