Storage Management
- W.Erber
To add additional disk storage to your Charon-SSP AWS instance (for example, for storing virtual disk containers), perform the steps described below.
Please note: the GUI may look slightly different depending on which version of the GUI you use. However, the available options should be the same.
Contents
AWS Storage Environment
In the AWS environment, you can, for example,
- create a new storage volume,
- attach an existing storage volume to your instance,
- detach a storage volume from your instance.
These steps are shown below.
For more details, please refer to the AWS documentation.
Creating a New Volume
| Step | Details |
|---|---|
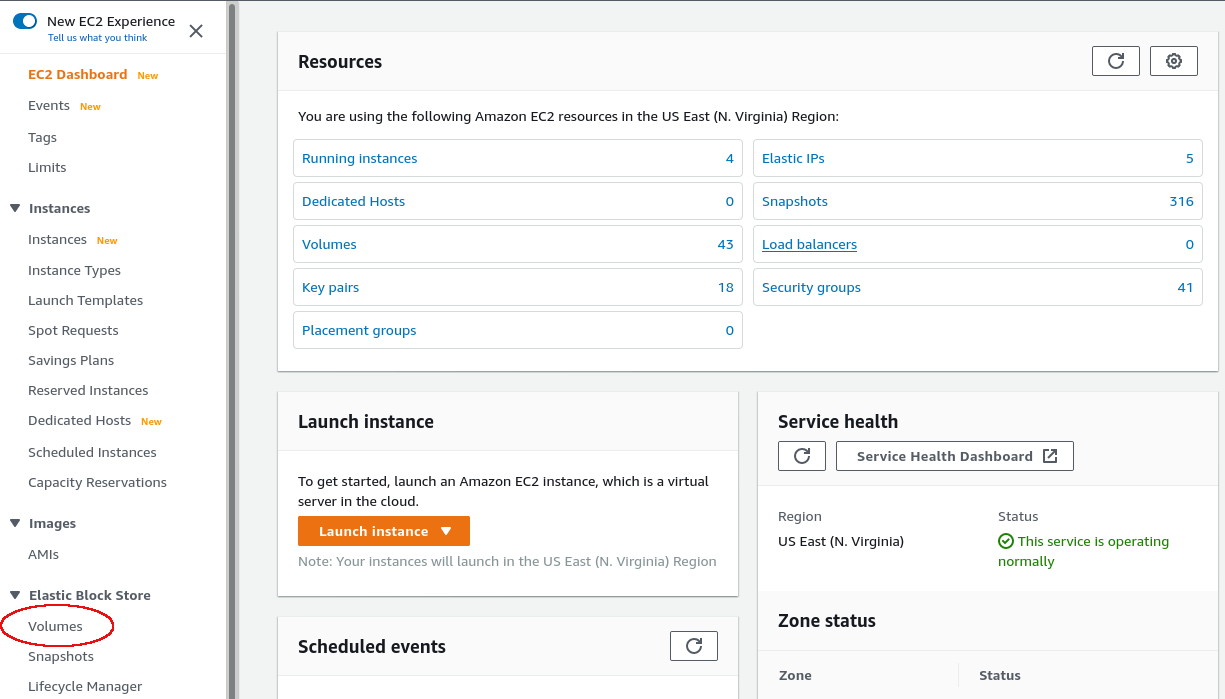
| Open the Volumes configuration from the EC2 dashboard |
This will open the volume overview screen. |
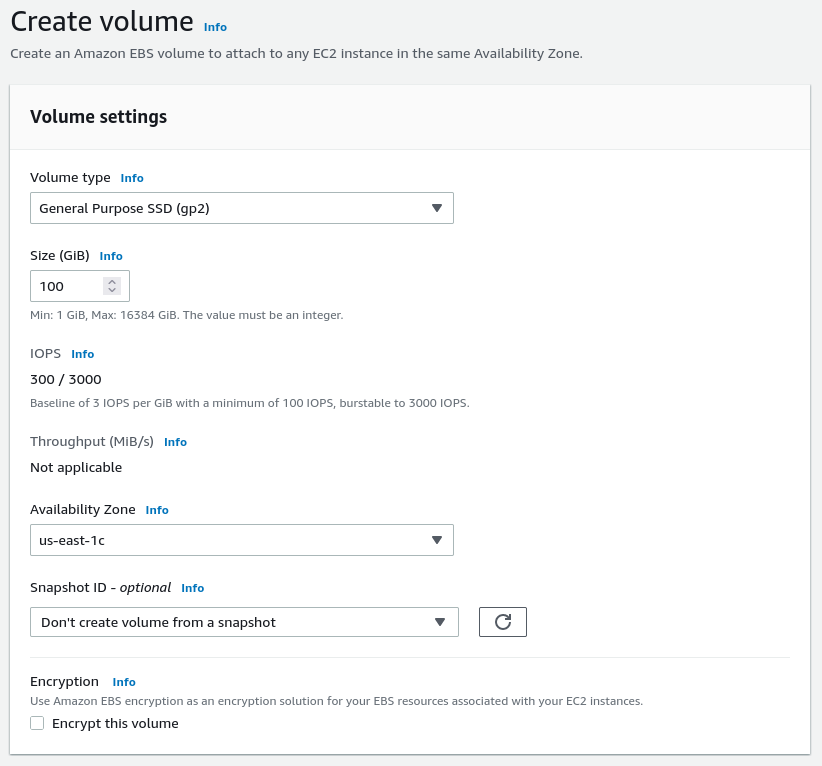
| Create a new volume | Click on the Create Volume button on top of the volume overview screen.
This will open the volume creation window. |
Select
Then click on Create Volume at the bottom of the window.
| |
| You will receive a confirmation window. Close it to return to the volume overview screen where you should now see the new volume. |

Attaching an Existing Volume to an Instance
Once a volume has been created, you can attach it to your instance.
| Step | Details |
|---|---|
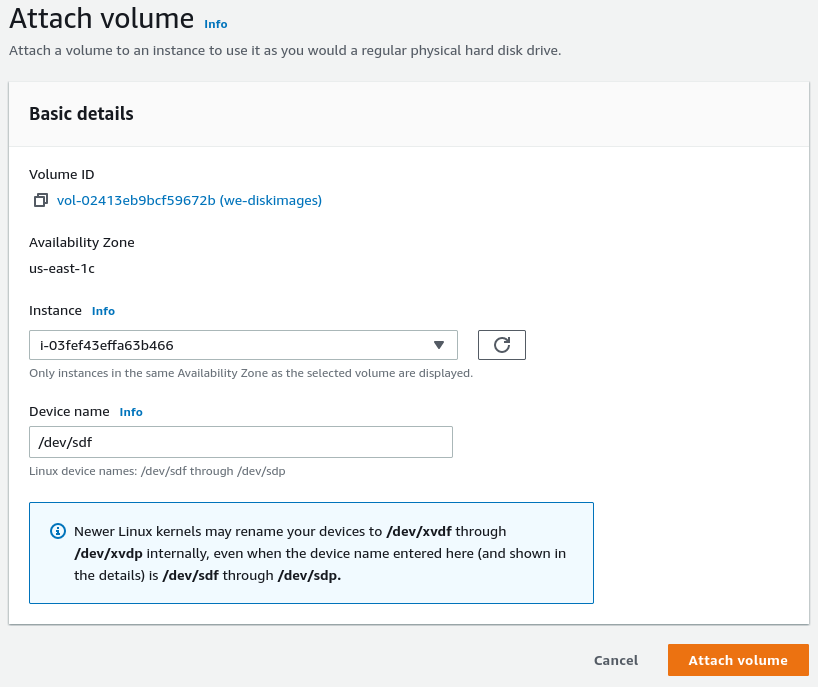
| Attach the volume to your instance | In the volumes overview screen, check that your volume has the state available. Right-click on it and select Attach Volume. This will open a small input screen. |
Select the instance to which the volume is to be attached. Optionally, you can change the device name that will be presented to the Charon-SSP AWS instance. Click on Attach to confirm the configuration and to attach the volume to the instance. The status of the volume in the volume overview screen will change from available to in-use. | |
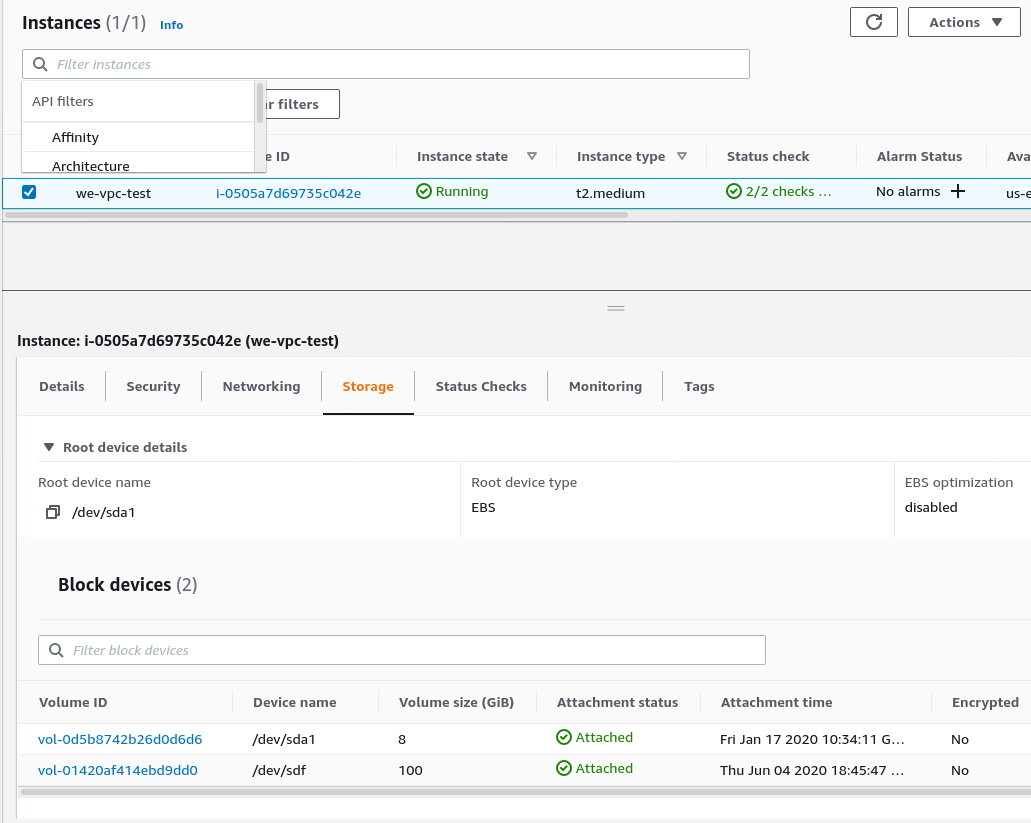
| Verify success in the instance description | Go to the instance overview list and select your instance. In the storage tab at the bottom, you will see that the instance now has two block devices.
|
Detaching a Volume from an Instance
If the volume is the root device of the instance, you must stop the instance before detaching the volume.
If the volume is not the root device of the instance, unmount the volume in the Charon host system before detaching it (see Steps on the Charon-SSP Host System below).
Then detach the volume from your instance:
- Go to the Elastic Block Store volumes list.
- Select the volume to be detached.
- Use the menu Actions > Detach volume.
Steps on the Charon-SSP Host System
Mounting a Newly Attached Volume Using the Storage Manager (AL Images only)
After the volume has been attached to the instance, it must be included in the Charon-SSP host system configuration. On a Charon-SSP AL instance, this is achieved via the Charon-SSP Manager.
- Open the Charon-SSP Manager on your local system and connect to your Charon cloud instance.
- Select Tools > AWS Cloud > Storage Manager.
- In the Storage Manager window, perform the following steps:
- Select the new device.
- Click on the cog-wheel symbol.
- Only if required, select Format Volume to create a filesystem on the new device.
Please note: This will delete all data on the volume. - Click on the cog-wheel symbol and select Mount the Filesystem.
This will mount the new volume under /charon/storage/media/<UUID>/. The following image shows a sample:
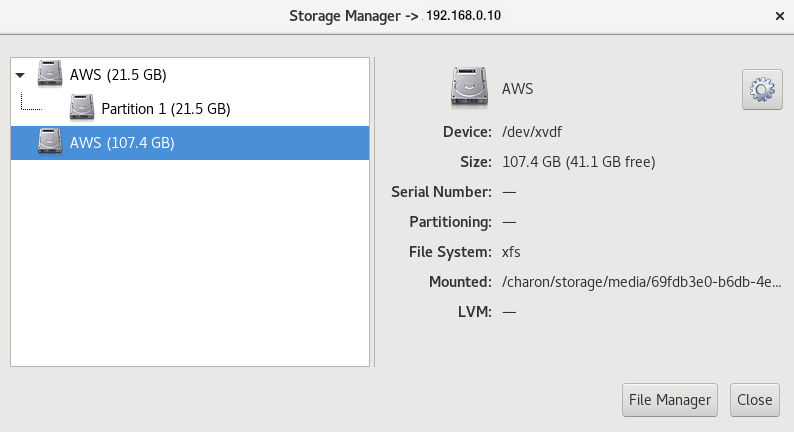
Please note: The device on the host system is called /dev/xvdf (XEN virtual block device). This is equivalent to an /dev/sdf volume shown in AWS. The device naming depends on the instance type and the kernel storage drivers. For example, a device may be presented to LInux as a nvme device as well.
Once the filesystem has been mounted, the space is available to the Charon-SSP host system. After the first mount via the Storage Manager, the filesystem will be automatically mounted after a restart of the Charon host instance.
Mounting a Newly Attached Volume Manually
This is an example of how to mount (and if necessary partition) an additional disk on a Charon host system. Please refer to the Linux manual pages for details.
The general tasks on the Charon host system require to identify the disk, add a file system to it (if this has not been done before), and mount the disk on a suitable mount-point.
Please note: the different cloud environments may offer the disk volumes to the Linux instance using different names. However, the basic steps will be the same as in the examples below.
Step 1: Identify new disk
After logging in on the system, you can identify the new disk using the lsblk command:
# lsblk
NAME   MAJ:MIN RM  SIZE RO TYPE MOUNTPOINT
sda      8:0    0   20G  0 disk
├─sda1   8:1    0  200M  0 part /boot/efi
└─sda2   8:2    0 19,8G  0 part /
sdb      8:16   0  200G  0 disk
In the example above, the new disk is /dev/sdb. The output shows no mount-point, i.e., the disk is not mounted yet. It also does not have any partitions.
Please note:
- A disk without partitions can also have a filesystem and data on it. Hence be sure that the disk really does not have any important data on it before you partition it.
- If a system has many disks, it is helpful to run the lsblk command before the new disk is added. This makes it easy to identify the new disk in the output after it has been added.
Step 2: Partition disk (fdisk or parted) - only if required
Please note: This step is only meant for new disks or to re-partition an existing disk. It will destroy all data on an existing disk.
Please refer to the manual pages ($ man parted and $ man fdisk) of your Linux distribution for details on the disk-partitioning commands. If the whole disk is used for one filesystem, it is not strictly required to create a partition. The decision of which disk layout is required depends on the customer requirements is the responsibility of the user.
After creating one partition on disk with fdisk (# fdisk /dev/sdb), the lsblk output shows the new partition:
# lsblk
NAME   MAJ:MIN RM  SIZE RO TYPE MOUNTPOINT
sda      8:0    0   30G  0 disk
├─sda1   8:1    0  500M  0 part /boot
└─sda2   8:2    0 29,5G  0 part /
sdb      8:32   0   64G  0 disk
└─sdb1   8:33   0   64G  0 part
Step3: Create a filesystem on the new partition(s)
Use the mkfs command to create a new filesystem. The selection of a filesystem depends on customer requirements. For example, to create an XFS filesystem, use
# mkfs.xfs /dev/sdb1
Please refer to the documentation of your Linux distribution for details about the mkfs command.
Step 4: Create a mount-point and mount the new filesystem
The following example shows how to create a mount-point and mount the file system.
To keep the example consistent with the sample outputs above, /dev/sdb1 is used in this example. However, as the /dev/sdX device names are not guaranteed to be persistent across reboots, it is strongly recommended to use names from the /dev/disk/by-* hierarchy (for example by-uuid) for permanent, production use.
# mkdir /space# mount /dev/sdb1 /space
The df command shows the mounted filesystem:
# df
Filesystem     1K-blocks    Used Available Use% Mounted on
devtmpfs         4065684       0   4065684   0% /dev
tmpfs            4077556      16   4077540   1% /dev/shm
tmpfs            4077556    9224   4068332   1% /run
tmpfs            4077556       0   4077556   0% /sys/fs/cgroup
/dev/sda2       30929148 1677416  29251732   6% /
/dev/sda1         508580   65512    443068  13% /boot
tmpfs             815512       0    815512   0% /run/user/1000
/dev/sdb1       65923628   53272  62498580   1% /space
Step 5: Mount the disk automatically at system boot
To mount the disk automatically when the system boots, you must add it to the file /etc/fstab.
Please note: The device naming /dev/sdXN (e.g., /dev/sdb1) is not guaranteed to be persistent across reboots. Hence, it is advisable to use a persistent name from the /dev/disk/by* hierarchy (for example, the UUID).
You can use the ls or the blkid command to identify the UUID. Examples:
$ ls -l /dev/disk/by-uuid/
total 0
lrwxrwxrwx. 1 root root 10 2020-08-14 21:14 0c523909-fb78-48cb-9dc8-e7a08197a673 -> ../../dm-4
lrwxrwxrwx. 1 root root 10 2020-08-14 21:14 31fa8e8c-a6c0-45f7-9892-da13ba81e0e5 -> ../../sdb1

$ blkid |grep sdb1
/dev/sdb1: UUID="31fa8e8c-a6c0-45f7-9892-da13ba81e0e5" BLOCK_SIZE="4096" TYPE="xfs" PARTUUID="db62deaa-f25f-43d4-b958-700c1c13d844"
To add the device to /etc/fstab perform the following steps:
- As the root user, open the file /etc/fstab with a text editor.
- Add the mount command to the file. Please note: The following is for illustration only. The exact options depend on your requirements.
Sample fstab entry:UUID=31fa8e8c-a6c0-45f7-9892-da13ba81e0e5 /space xfs defaults 1 2 - Save the file.
- Test if the automatic mount works correctly.
Unmounting a Volume
To unmount a volume before perform the following steps:
- Stop all Charon instances that might use the volume that is about to be unmounted.
- On host systems based on AL images:
- In Charon Manager go to Tools > AWS Cloud > Storage Manager.
- Select the volume.
- Click on the cogwheel symbol and select Unmount the Filesystem.
- On other systems:
- Use the command
# umount <device-path>or# umount <mount-point> - To make this permanent, remove the corresponding entry in /etc/fstab.
- Use the command
Related content
© Stromasys, 1999-2024 - All the information is provided on the best effort basis, and might be changed anytime without notice. Information provided does not mean Stromasys commitment to any features described.