Dedicated NIC for Guest System
- W.Erber
Contents
Providing a dedicated NIC for guest operating systems is the standard method in non-cloud environments. However, this configuration poses some challenges in cloud environments where MAC address / IP address combinations are fixed parameters set by the cloud provider.
This section will provide some information about how to configure such a setup in a cloud environment. It is not specific to one cloud provider. Hence, the descriptions may refer to different cloud providers if appropriate.
Basic Concept
The following images illustrates the basic concept when working with a dedicated network interface for the guest operating system. There are, of course, many variations depending on the specific environment.
Scenario: host and guest system have a dedicated NIC. The NIC used by the Charon host has a private and a public IP address, the NIC used by the guest system a private IP address and optionally a public IP address. The Internet and VPN gateways are only used for illustration and are not part of this example.
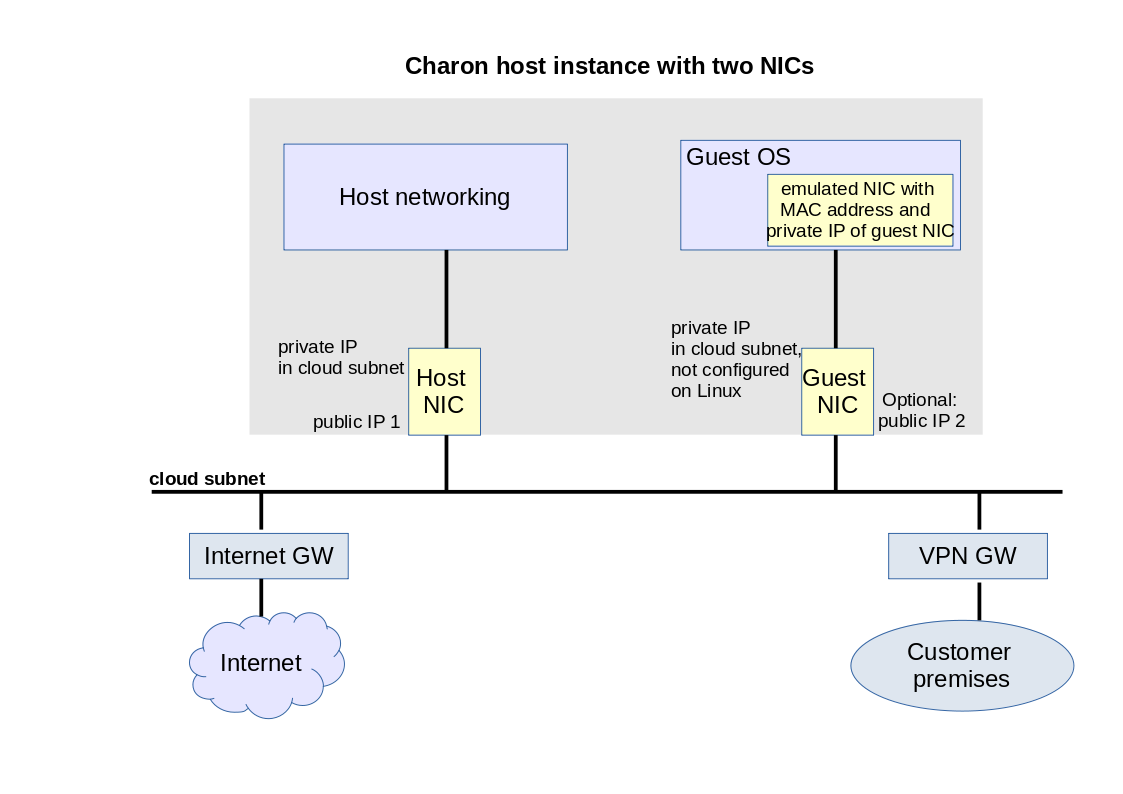
Please note: If the NIC dedicated to the guest OS does not have a public IP address, the guest system may still be able to access the Internet via the customer network reachable across a VPN gateway. This will depend on the customer specific network configuration. This type of connection is the recommended way to provided external network access to the guest system as the VPN ensures that traffic across a public network is encrypted.
The basic steps to implement the above configuration are as follows:
- Create a cloud instance in which the Charon host system runs.
- Add two NICs to the Charon host system. One for the Charon host and one for the guest system.
- Configure the appropriate access rules for instance and NICs.
- One NIC is dedicated to the Charon host, one to the guest system. Configure a private and public IP address for the NIC used by the Charon host. Configure a private IP address for the NIC used by the guest system (and optionally a public IP address - not recommended).
- On the Charon host, remove the private IP address from the NIC dedicated to the guest system if it was automatically configured and ensure that the interface will be enabled when the system starts.
- Assign the appropriate NIC to the guest system.
- Configure the guest system MAC address to be the same as the one of the NIC selected for the guest.
- After booting the guest system, configure the private IP originally assigned to the guest NIC by the cloud provider as the IP address of the guest Ethernet interface.
- Set the default route of the guest system to the default gateway or VPN gateway of the LAN.
Depending on firewall rules and cloud-specific security settings, the guest system should then be able to communicate with the following systems:
- The host system.
- The other systems in cloud-internal network (e.g. other guest and host systems).
- The customer internal network via a previously configured VPN gateway.
- Directly with the Internet if a public IP address was configured for the interface (not recommended).
The additional sections in this chapter show the basic configuration steps for the above example.
Please note:
- In this scenario any direct traffic between host and guest system (if configured with a public IP address) and external systems reachable via the Internet gateway is not encrypted by default. If this traffic runs across a public network, it is exposed to being monitored and even modified by third parties. The user is responsible for ensuring data protection conforming to the user's company security rules. It is strongly recommended to use encrypted VPN connections for any sensitive traffic.
- Guest operating systems are often old and no longer maintained by the original vendor. This means they are more easily compromised by attacks from the Internet. Therefore, direct Internet access for the guest system is not recommended.
- The actual configuration steps vary depending on the cloud environment used. The sample configuration below will have to be adapted to the specific environment.
Configuration Examples
Important information:
- The example assumes that the host operating system is a RHEL version 7 or 8 compatible Linux system. If you use a different host operating system version, you must adapt the example accordingly.
- As explained for AWS, remember that any automatically assigned public IP addresses will be removed by the cloud provider once the instance is restarted with a second NIC. Hence, on AWS Elastic IP addresses must be used.
- For Google cloud, note the following:
- The default is that all interfaces are configured with IP addresses automatically by GCP services on the Linux host. Please refer to the Network Management section in the respective Getting Started guide for information on how to disable this automatic configuration.
- Some base images used to create a Charon host instance may be configured to use /32 netmasks for additional interfaces, and only ARP requests for the default gateway are answered by Google. This can cause communication problems between Solaris and other instances on the same subnet (ARP requests are not answered). The workaround is to use static ARP entries on Solaris. Please refer to the Getting Started guide for more information. Current images provided by Stromasys use /24 netmasks, so this point does not apply to them.
- The interface names used in this example (eth0 and eth1) may be different on your system. Please verify the names on your system and refer your cloud provider's documentation for more detail. Make sure you use the correct names!
- The example uses only a private address for the dedicated interface. If a public address is required, the basic steps for making the interface available to the guest system are the same.
Step 1: Prepare Second NIC on Host for Use by the Solaris Guest
The host system interface configuration must ensure that the private IP address allocated to the new interface by the cloud provider is not configured on the Linux Ethernet interface. This address will be used by the guest system.
The configuration depends on whether the network configuration on the Linux host is file-based (typically Linux 7.x) or NetworkManager-based (typically Linux 8.x). Examples for both are shown below. Typically, the NetworkManager is disabled on Charon-SSP marketplace images based on Linux 7.x, and enabled on Charon-SSP marketplace images based on Linux 8.x.
Expected result of the examples in this section:
- The system should still be reachable via eth0.
- Interface eth1 should be up without having an IP address configured.
File-based Configuration Examples
This configuration applies to systems with a file-based network configuration where the NetworkManager is either not active, or where network interfaces should be excluded from NetworkManager control (e.g., to be managed by the Charon Manager). The NetworkManager is disabled by default in older Charon-SSP marketplace images that are based on Centos 7.
Please note:
- The sample configuration assumes a CentOS 7 system and that the interface is configured outside the control of the NetworkManager.
- Should the NetworkManager be active, the plugins ifcfg-rh and ibft must be enabled in section main of the NetworkManager configuration file /etc/NetworkManager/NetworkManager.conf.
- After the initial creation of the ifcfg-file, the interface can be managed by the Charon-SSP Manager.
To make the second interface usable for the Charon guest system, perform the following steps:
- Add a second interface to your instance as described in the cloud-specific Getting Started guide and your cloud provider's documentation.
- Log into the instance and become the root user (use:
sudo -i) - Identify the names of the two Ethernet interfaces:
# ip link show - Create an interface configuration file for the second interface (the file for the first one should exist). Example (use correct interface name for your configuration):
# cp /etc/sysconfig/network-scripts/ifcfg-eth0 /etc/sysconfig/network-scripts/ifcfg-eth1 - Edit this file to match the characteristics of eth1 (use correct interface name for your configuration). The private IP address used for this interface will be assigned to the Solaris guest. Therefore, configure the Linux Interface without IP address, similar to the example below.
Please note:
On some cloud platforms, the automatic cloud-specific configuration prevents the entries in the ifcfg-file to take effect (for example on GCP). Please refer to your cloud-provider's documentation and the Network Management section in the Getting Started Guide of your version for additional information.BOOTPROTO=noneDEVICE=eth1NAME=eth1ONBOOT=yesTYPE=EthernetUSERCTL=no
NM_CONTROLLED=no - Restart the network:
# systemctl restart networkPlease note: Should there be an error when executing this command, kill the DHCP client process and retry the command.
NetworkManager-based Configuration Examples
The following sections show two examples:
- Configuration using nmcli commands
- Configuration using the Charon-SSP Manager
Using nmcli Commands
To configure the interface dedicated to the emulator such that it receives no IP address but is activated at start, you could use command similar to the following:
1. Identify the NetworkManager connection to configure. The interface may have been automatically activated by the NetworkManager. In the example, it is "Wired connection 1" on device eth1.
# nmcli conn show
NAME                UUID                                  TYPE      DEVICE
System eth0         5fb06bd0-0bb0-7ffb-45f1-d6edd65f3e03  ethernet  eth0
Wired connection 1  027a1c2b-3397-37fb-a6e2-f2e02eb59992  ethernet  eth1
If there is no connection for the interface yet, check if the device is visible using the command nmcli dev status or ip link show.
2. For an existing connection:
a) Configure an appropriate name for the connection if required:
# nmcli conn mod "Wired connection 1" con-name eth1
b) Set the IP configuration such that no IP address is assigned:
# nmcli conn mod eth1 ipv4.method manual ipv4.address 0.0.0.0
c) Configure automatic interface activation at boot:
# nmcli conn mod eth1 connection.autoconnect yes
3. If no connection for the second interface exists:
Add a new connection (with automatic interface activation, without IP address):
# nmcli conn add con-name eth1 type ethernet ifname eth1 autoconnect yes ipv4.method manual ipv4.addresses 0.0.0.0
4. (Re-)Activate the connection:
# nmcli con up eth1
Using the Charon Manager
The Charon-SSP Manager provides basic network configuration options.
- To access them, start the Charon Manager and open the menu option:
Tools > Network Settings - To configure a host system for use by the emulator perform the following steps:
- Select the correct interface.
- In the IP setting field select None.
- Click on Apply.
Step 2: Add the Dedicated NIC to the Emulator Configuration
- Start the Charon Manager and open the configuration window for the emulated system.
- Configure the emulated system with the dedicated Ethernet interface as its interface.
- Set the MAC address to the same value as used by the host interface (the value assigned by your cloud provider).
- Save your configuration.
Step 3: Configure the Solaris Guest to Use the Private Cloud IP Address
Using the steps below, the Solaris guest system is configured to use the second NIC configured on the host system (please refer to your Solaris documentation for configuration details).
- Boot Solaris and configure the IP address assigned to the dedicated guest NIC for the Solaris Ethernet interface as shown in the examples below:
# ifconfig <interface-name> <private-guest-nic-ip>/<netmask up(Solaris 10 example)# ifconfig <interface-name> <private-guest-nic-ip>netmask<mask> up
# ipadm create-ip netX and ipadm create-addr -T static -a <private-guest-nic-ip>/<netmask> netX/v4 (Solaris 11 example)
For Solaris versions before version 11, make permanent by editing /etc/hosts and set the new address for the systems hostname. Then edit /etc/netmask and add the netmask for the subnet-network. - Add default route on Solaris:
# route add default <default-gateway-of-cloud-lan> <metric>
Make permanent by editing /etc/defaultrouter and add the address of the gateway (use route -p for newer Solaris versions). - Add DNS server to Solaris (if needed)
- Edit /etc/resolv.conf and add a nameserver line for the DNS server.
- Make sure, DNS is used for hostname translation: ensure that /etc/nsswitch.conf is configured to allow dns (in addition to files) for the hostname resolution.
For Solaris 11, please refer to the Oracle Solaris documentation.
Expected result (depending on security rules and firewalls):
- The guest system should be able to communicate with the host system across the cloud LAN using the private IP addresses.
- The guest system should be able to communicate directly with the Internet if the dedicated NIC has a public IP address (not recommended).
Please note: Do not forget that traffic transmitted across the Internet by the guest system is not encrypted by default. Take appropriate measures to protect your data. It is strongly recommended to protect the Solaris guest system by an appropriate firewall and security group configuration. If possible, any communication across the Internet should be encrypted (e.g., by using a VPN).
Related content
© Stromasys, 1999-2024 - All the information is provided on the best effort basis, and might be changed anytime without notice. Information provided does not mean Stromasys commitment to any features described.