


User Access to the Virtual SPARC System
- W.Erber
Contents
Console access to the virtual SPARC system is possible in different ways:
- Virtual serial port (appearing as a physical port to Linux)
- Built-in serial console displayed by the Charon Manager
- Graphical console (not applicable to Charon-SSP/4V)
There are also several other methods for interactive access:
- Telnet or SSH connection from a remote system via a terminal emulation program
- Graphical user interface via the emulated graphics device or a remote X-Display
Console Access
Physical Serial Console Access
For physical console access, the virtual machine must be configured to attach the virtual serial port to a physical serial port on the host system. This configuration task is performed using the Charon-SSP Manager as shown in Serial Line Configuration. Charon-SSP AWS cannot have hardware physical ports, so these ports must be emulated over a network connection.
Additional serial port configuration options, such as speed, parity, and stop-bits must be configured using the ttya‑mode variable in the OpenBoot guest environment. For additional information regarding the configuration of the ttya-mode variable, see the OpenBoot Console in the appendix.
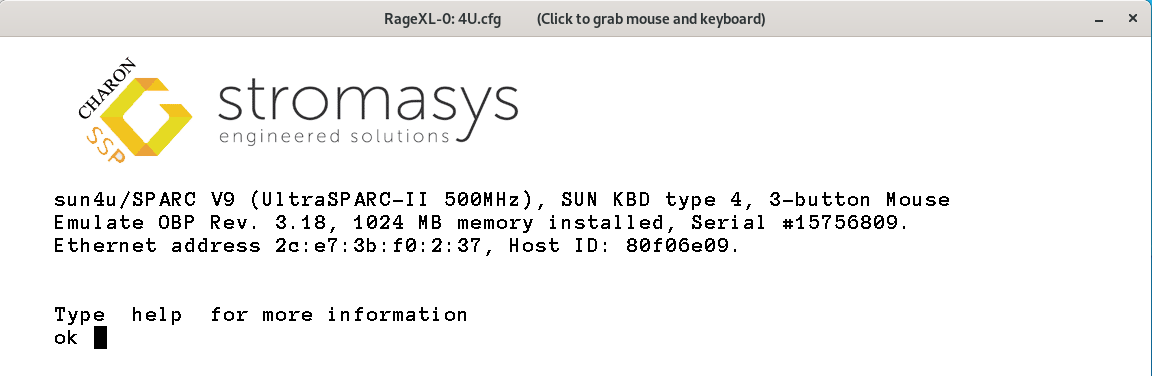
Built-in Serial Console of the Charon Manager
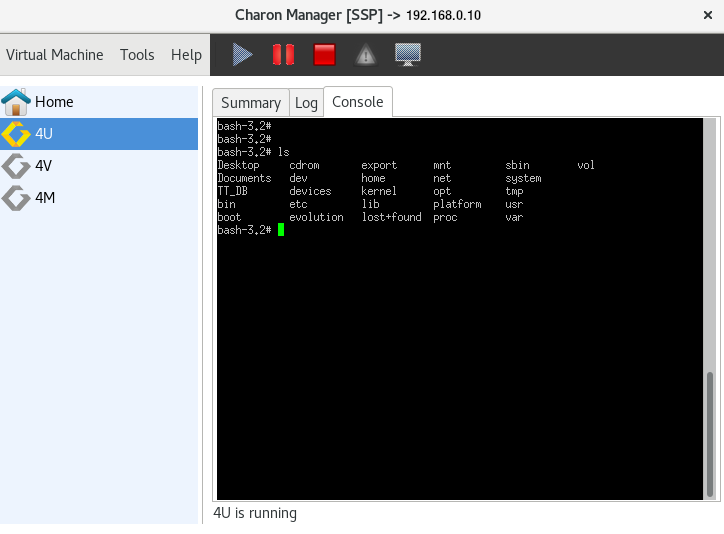
From the Charon-SSP Manager you can access the serial console via the Console tab. The example below shows the console of a SUN-4U system.
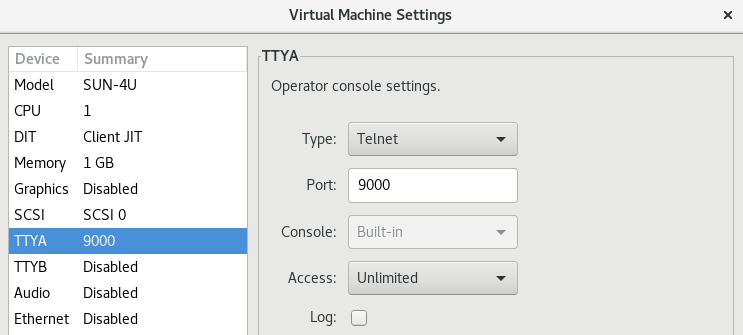
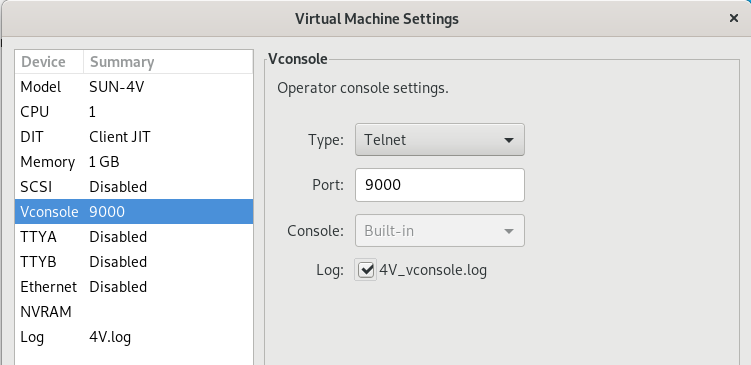
To configure the serial console access for the Charon-SSP Manager, use a TTYA (4M and 4U) or a Vconsole (4V) configuration similar to the one below.
The port type must be TCP Raw or Telnet.
The console parameter must be set to Built-in (this is the only option in the Charon-SSP AWS product).
The TCP port specified must not be used for another application or another emulated Charon-SSP serial port on the same host system.
![]() If the access to the Charon-SSP host system is via an SSH tunnel, no additional ports need to be opened in any intermediate firewall or AWS security groups. Otherwise, make sure the ports selected for the console connection are not blocked by such firewalls or security groups.
If the access to the Charon-SSP host system is via an SSH tunnel, no additional ports need to be opened in any intermediate firewall or AWS security groups. Otherwise, make sure the ports selected for the console connection are not blocked by such firewalls or security groups.
The example below shows the serial console configuration of a Charon-SSP/4U and a Charon-SSP/4V system.
| Charon-SSP/4U |
|
| Charon-SSP/4V |
|
![]() Only one connection to the console is possible at one time. If the Charon Manager is connected via the integrated SSH tunnel and you try to open a second connection to the console via a remote terminal emulation program, Charon Manager will terminate the second connection and re-establish the built-in console connection. If the Charon Manager is not running or not connected via the integrated SSH tunnel, a console connection can be established via a remote terminal program and the built-in console tab will be disconnected.
Only one connection to the console is possible at one time. If the Charon Manager is connected via the integrated SSH tunnel and you try to open a second connection to the console via a remote terminal emulation program, Charon Manager will terminate the second connection and re-establish the built-in console connection. If the Charon Manager is not running or not connected via the integrated SSH tunnel, a console connection can be established via a remote terminal program and the built-in console tab will be disconnected.
![]() If a second connection via Charon Manager is made to the same system, the current Charon-Manager connection is terminated.
If a second connection via Charon Manager is made to the same system, the current Charon-Manager connection is terminated.
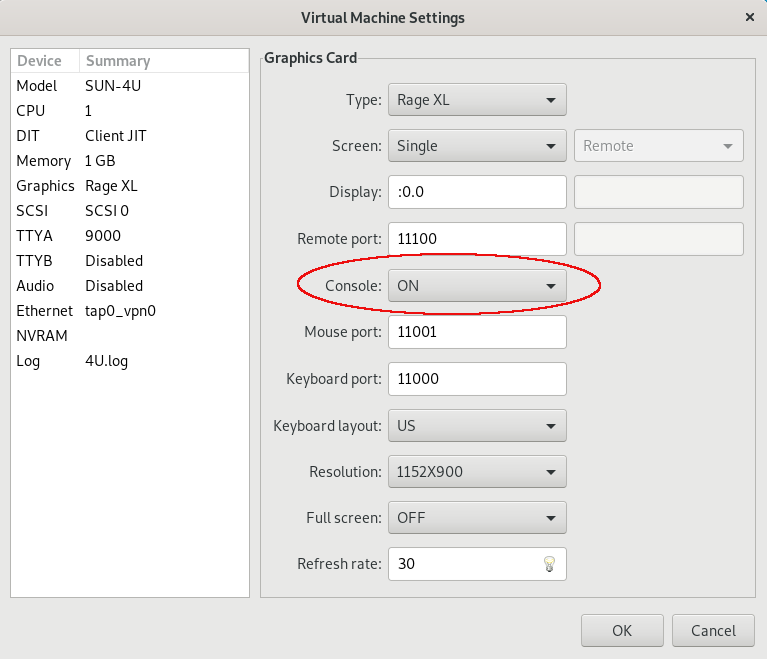
Console Access via the Emulated Graphics Device (Charon-SSP/4M/4U(+) only)
To enable the emulated graphics device as the console, set the Console configuration option to ON:
![]() Unless the connection is made across a VPN, the ports configured in the window above must be permitted by any intermediate firewall and/or AWS security group.
Unless the connection is made across a VPN, the ports configured in the window above must be permitted by any intermediate firewall and/or AWS security group.
![]() When booting for the first time after adding the configuration, use boot command
When booting for the first time after adding the configuration, use boot command
boot <device> -r
to configure the graphics device correctly in the Solaris guest system.
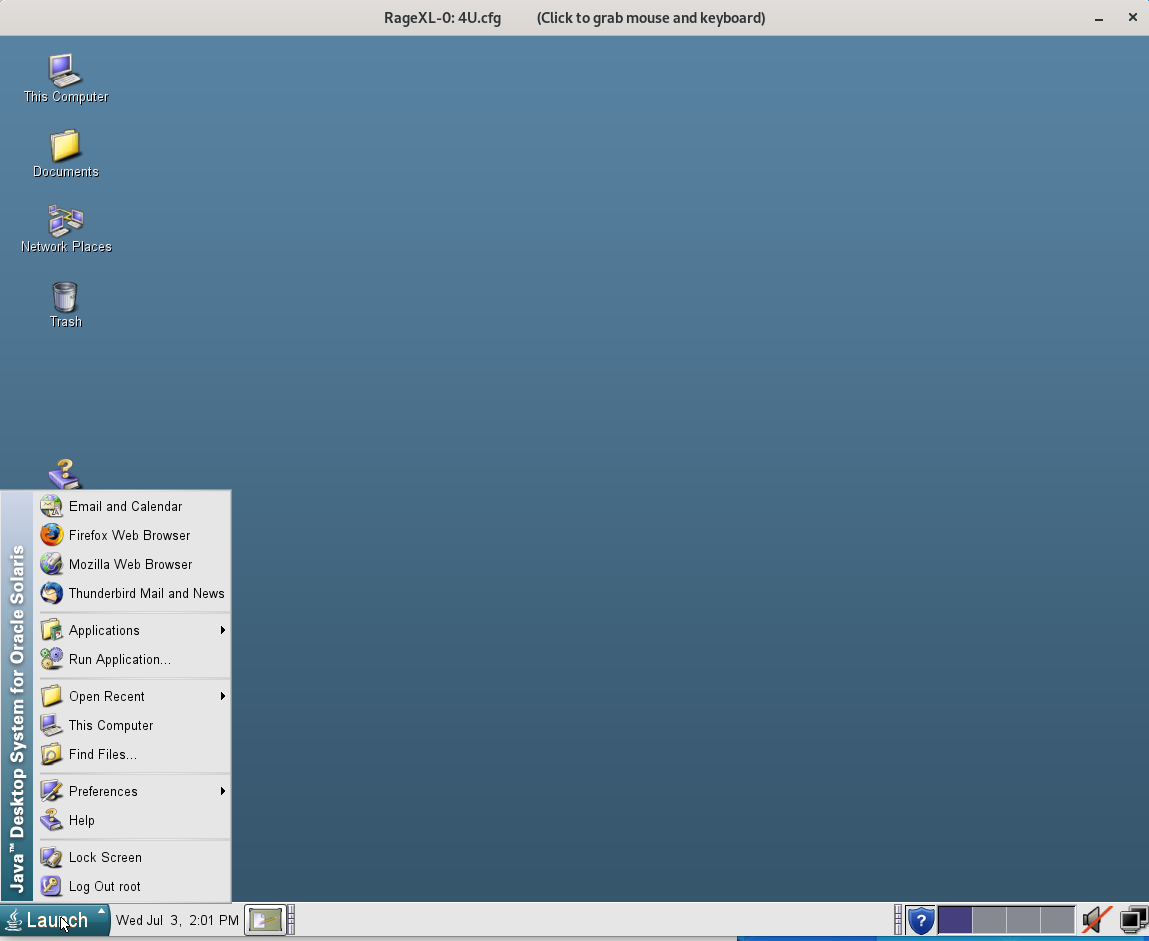
After starting the emulated system, the graphics devices opens:
| OPB console | Desktop after booting |
|
|
Please note:
The graphical performance depends on many parameters, for example, the performance of the host system, the emulated system, and the network.
One important requirement is that the round-trip time of the network connection between display device and emulated Solaris system running on the AWS instance should be less or equal to 20ms.
For every use case, a test is required to evaluate the suitability for the specific customer environment.
Other Interactive Access to the Virtual SPARC System
Once the Solaris guest has been booted, you can connect to it by several means. For example:
- Remote terminal emulation program using telnet.
- Remote terminal emulation program using SSH.
- Graphical desktop via a remote X-server configured in the Charon Manager (see Graphical Interface via X11 Server on Linux).
![]() Direct root login over the network must be allowed on Solaris if required.
Direct root login over the network must be allowed on Solaris if required.
- For SSH: set
PermitRootLogin yesin /etc/ssh/sshd_config to allow interactive login with passwords. - For general login: comment out the
CONSOLE=/dev/consoleline in /etc/default/login.
Related content
© Stromasys, 1999-2024 - All the information is provided on the best effort basis, and might be changed anytime without notice. Information provided does not mean Stromasys commitment to any features described.