
__Include: Creating and Configuring an AWS Cloud Instance for Charon - Older GUI
- W.Erber
Contents
As this description shows the basic setup of a Linux instance in AWS, it does not list specific prerequisites. However, depending on the use case, the following prerequisites should be considered: Please note that the AWS GUI occasionally changes. This may lead to screenshots not always reflecting the exact appearance of an configuration screen. To start the creation of a new cloud instance, perform the following steps: 1. Log in to your AWS management console. 2. Find and select the EC2 service. You can use the All services drop-drop down or find it in the Recently visited services. This will open the E2C dashboard. Please note: The following sample image shows the new E2C dashboard. The old dashboard looks somewhat different, but still has the Launch instance button. 3. On the EC2 dashboard click on the Launch Instance button. Clicking on Launch Instance will initiate the instance creation process consisting of seven steps: These steps are described in the next section. The instance creation and configuration process will guide you through a number of configuration steps and allow you to start the new instance when done. 1. Choose AMI: AMIs are prepackaged images used to launch cloud instances. They usually include the operating system and applicable application software. Which AMI you select depends on the planned use of the instance: After deciding on which AMI is required, select a matching Linux or Charon product AMI in the Marketplace or (depending on your environment) from My AMIs. Clicking on one of the categories above will display a list of images. Select the Linux AMI appropriate to your planned use of the instance, that is, This will take you to the next step, the instance type selection. 2. Choose Instance Type: Amazon EC2 offers instance types with varying combinations of CPU, memory, storage, and networking capacity. Select an instance type that matches the requirements of the Charon product to be used. Please note that some marketplace images have a restricted selection of instance types. When done, continue by clicking on the Next: Configure Instance button at the bottom of the page. 3. Configure Instance: In this section, you can set up the details of your instance configuration. For example, you can select the following: Additional configuration for special licensing situations: Enter the information for the AutoVE license server as shown in the example below (it shows the public AutoVE servers): Valid User Data configuration options: where Please note: at least one license server must be configured at initial launch to enable AutoVE mode. This can be via the /opt/charon-license-server file with the default public servers (SSP 5.6.8 or higher) or via the manual user data configuration. Otherwise, the instance will bind to one of the public AL license servers operated by Stromasys. Once you have selected all desired configuration options, click on Next: Add storage at the bottom of the page to continue. 4. Add Storage: The size of the root volume (the system disk) must be appropriate for your environment (recommended minimum system disk size: 30GB). You can add more storage now or later to provide space for virtual disk containers and other storage requirements. Please note: It is recommended to create separate storage space (using AWS EBS volumes) for Charon application data (e.g., disk images). If required, such volumes can later easily be migrated to another instance (see Storage Management). Once you are done, again click on the Next: Add tags button. 5. Add Tags: Tags allow you to add information to your instance, for example, an easily remembered name as shown in the example below: Please note: you can also rename your instance after creating it by clicking on the pencil symbol next to the instance name in the list of instances. After adding tags as required, continue to the next step (Configure Security Groups). 6. Configure Security Groups: A security group is similar to a firewall. It defines which traffic is allowed to flow to and from the instance. For your cloud instance, you must at least enable SSH access to the system. This will allow you to access the installed system and product specific management interfaces such as the Charon-SSP Manager, and to run Charon services via an SSH VPN tunnel. You can select an existing group or create a new one. If you create a new one, you can enter an name and an appropriate description. An example of a security group is shown below. The warning shown alerts the user to the fact that the source IP addresses are not restricted, i.e., any system is allowed to use SSH to access the instance. Restrict the source address range if possible. Once you have set up your security group, continue to the next step (Review and Launch). 7. Review: Here you can review the configuration of your instance and edit the individual sections if required. The image below shows a sample: If you are satisfied with the settings, click on the Launch button to start your instance for the first time. 8. Launch and select/create key-pair for access: When starting the instance for the first time, you will be shown a window asking you to create a new key-pair or to use an existing one. When creating a new key-pair, you must download the private key to your local system and store it in a safe place. It is required to access your instance. The public key is stored in the newly created Linux cloud instance. When using a Charon-SSP marketplace image, the public key is stored in the authorized_keys file of the sshuser and the charon user. For other Linux images it is stored in the defined management user for the image. The sample below shows the window when the creation of a new key-pair was selected: You cannot start the instance without downloading the key. If you select to re-use an existing key-pair, you must confirm that you are in possession of the private key before you can launch the instance. Verify that instance is running: After starting your instance for the first time, you will see it in the initializing state in the list of your AWS instances. It will take a bit of time to get to the running state. After this, important information, for example, the public IP address and public DNS name (marked in red) of the instance will also be displayed. The following image shows an example: The following sections will show you how to access the instance and how to perform additional storage and network configurations. Please note:General Prerequisites
AWS Login and New Instance Launch


New Instance Configuration


Please note: automatic assignment of a public IP address only works if there is only one network interface attached to the instance.
Please note: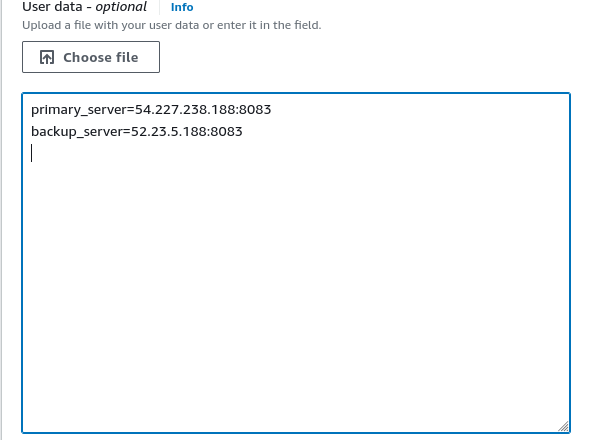
primary_server=<ip-address>[:<port>]backup_server=<ip-address>[:<port>]


© Stromasys, 1999-2024 - All the information is provided on the best effort basis, and might be changed anytime without notice. Information provided does not mean Stromasys commitment to any features described.