


CHARON-VAX and CHARON-PDP for Windows installation
Table of contents
Introduction
CHARON-VAX / CHARON-PDP products are distributed in form of a zip file that contains the CHARON-VAX / CHARON-PDP installation executable ("InstallShell.exe"). The InstallShell procedure offers the possibility to select several modules to install. It is recommended to install all modules (the default).
CHARON-VAX / CHARON-PDP installation consists of the following steps:
- Perform host system checks (hardware and software) to ensure the host platform meets minimum CHARON-VAX / CHARON-PDP installation requirements
- Optionally, create a specific CHARON username with administrative privileges
- Extract CHARON-VAX / CHARON-PDP installation procedure files from its archive
- Install CHARON-VAX / CHARON-PDP by running "InstallShell.exe" installer and following the instructions
- Install CHARON-VAX / CHARON-PDP license (hardware dongle or software license)
- Configure CHARON-VAX / CHARON-PDP host system, for example, network adapter, host OS services, etc.
Hardware Requirements
Number of CPU cores
Each CHARON-VAX / CHARON-PDP emulated CPU requires a corresponding physical core. So the total number of the host CPUs must exceed the number of emulated CPUs since some of the host CPUs must be dedicated to serving CHARON I/O operations and host operating system needs.
The following table shows the minimum and recommended number of CPUs required for VAX/PDP11 models:
CHARON-VAX / CHARON-PDP model | Minimal number of host CPU cores | Recommended number of host CPU cores |
|---|---|---|
VAX 6610 | 2 | 4 |
VAX 6620 | 3 | 4 |
VAX 6630 | 4 | 6 |
VAX 6640 | 6 | 8 |
VAX 6650 | 8 | 12 |
VAX 6660 | 8 | 12 |
| Other models | 2 | 2 |
When starting, the CHARON-VAX software checks the available number of host CPU cores. Currently, this check is based on the maximum number of VAX CPUs that can be emulated, not on the number of the actually configured VAX CPUs. Therefore the number of host CPU cores recommended for the maximum number of emulated CPUs - as shown in the right column of the table above - must be available. If the available number of host CPU cores is below this number, CHARON-VAX will issue a warning message even if the requirements for the configured number of VAX CPUs are fulfilled. The CHARON-VAX software will work despite this warning if the requirements for the configured number of VAX CPUs are fulfilled.
Hyperthreading must be switched off completely. Disable hyperthreading in the BIOS settings of the physical host or, for a VMware virtual machine, edit the virtual machine properties, select the Resources tab then select Advanced CPU. Set the Hyperthreaded Core Sharing mode to None.
CPU type and speed
Since CHARON-VAX / CHARON-PDP utilizes the LAHF instruction during VAX/PDP11 CPU emulation, please avoid using early (pre-2005) AMD64 and Intel 64 CPUs in CHARON host system since they lack this capability. AMD Athlon 64, Opteron and Turion 64 revision D processors from March 2005 and Intel Pentium 4 G1 stepping from December 2005 are LAHF instruction capable.
Concerning CPU speed, the general recommendation is that higher CPU frequency is better since it allows better emulated VAX/PDP11 performance. The minimal recommendation is at least 3 GHz.
Operative memory
The minimum host memory size depends on the amount of VAX/PDP11 memory to be emulated and on the number of CHARON-VAX / CHARON-PDP instances to be run on one host.
The minimum host memory is calculated according to the following formula:
The minimum host memory = (2Gb + the amount of VAX/PDP11 memory emulated) per CHARON-VAX / CHARON-PDP instance.
The maximum amount of VAX memory that can be created in the CHARON-VAX/66x0 products and supported by OpenVMS/VAX is 3584 Mb.
For details, see the memory size specification
Only in the case of a 32-bit host OS, when more than 1.5 GB VAX memory is configured, a 32 bit Windows host system must be configured for "large application memory". This is done by adding the /PAE and /3GB switches to the Windows boot.ini file.
To set the /PAE and /3GB startup switch in Windows:
Right-click My Computer and select Properties. The System Properties dialog box will appear.
- Click the "Advanced" tab.
In the "Startup and Recovery" area, click "Settings". The "Startup and Recovery" dialog box will appear.
- In the System startup area, click "Edit". This will open the Windows boot.ini file in Notepad.
In the [Operating Systems] section, add the following switches to the end of the startup line that includes the /fastdetect switch: /PAE and /3GB
- Save the changes and close Notepad.
Click OK two times to close the open dialog boxes, and then restart the computer for the change to take effect.
Disk storage
The total amount of disk space required for CHARON-VAX / CHARON-PDP can be calculated as a sum of all the disk/tape image sizes plus 500 MB for the CHARON software plus space required for the normal host OS.
Ethernet adapters
CHARON-VAX / CHARON-PDP networking assumes dedicated host Ethernet adapters; their number must be equal to the emulated adapters to be configured in CHARON-VAX / CHARON-PDP11. One adapter (optionally) can be left to the host for TCP/IP networking etc.
In case of VMware-based CHARON host it is mandatory to use "E1000" virtual network adapter. Please avoid usage of "E1000E" adapter since it may lead to problems with some TCP/IP services!
Starting with ESXi 6.5, it is not possible to select E1000 adapter when a new virtual machine is created using Windows 10, Windows Server 2012 and 2016 templates.
The following workarounds are available:
- Import the virtual machine from an older version of ESXi
- Do not select "Windows Server 2012", "Windows Server 2016" or "Windows 10/64bit" during virtual machine creation but select "Windows Server 2008" or "Other/Other 64bit" for example.
Software Requirements
- Microsoft Windows Server 2016 Standard and Datacenter Editions, 64 bit version
- Microsoft Windows Server 2012 R2 Standard and Datacenter Editions, 64 bit version (please notice that only R2 revision is supported)
- Windows 10 Pro and Enterprise Editions, 32 bit and 64 bit version
- Microsoft Windows Server 2008 R2 (SP1) Standard and Enterprise Editions, 64 bit version (please notice that only R2 revision is supported)
- Microsoft Windows 7 Professional and Ultimate (SP1) Editions, 32 bit and 64 bit versions
- Microsoft Windows 8.1 Professional Edition, 32 and 64 bit versions
- VMware ESXi 5.5 and 6.x up to 6.7 (requires a supported Windows operating system on top of a ESXi virtual machine)
- Microsoft Hyper-V (requires a supported Windows operating system on top of a Hyper-V virtual machine)
Host system preparation
All antivirus, screen saver, automatic (scheduled) backup and any other CPU consuming software as well as software that is able to temporarily lock CHARON files (such as automatic indexing) must be turned off, uninstalled and disabled. Alternatively it is also possible to exclude all CHARON executables and material folders from scanning for viruses, but please note that scanning slows down CHARON host anyway - it may be critical for some installations requiring maximum performance.
The power scheme must be set to "High Performance" with all the "Sleep" and "Standby" modes turned off.
The automatic installation of Microsoft updates must be disabled. MS updates to the CHARON host must be done only in specific service maintainence periods established by the system administrator. Before applying new updates one must shutdown the operating system running on CHARON and stop all the running CHARON instances and services.
Secure boot is not supported by CHARON at the moment since in this case host OS will not accept signature of distributed NDIS drivers needed for CHARON networking. Disable secure boot or use CHARON without networking (select "Ignore" when installation procedure reports that NDIS driver is not signed).
In case a network-wide license (red dongle or software license) is going to be used, the following operations have to be performed:
- On server side (where network license will reside): open port 1947 for both TCP and UDP
- On the client side, if broadcast search for remote licenses is to be used, UDP traffic from port 1947 of the license server to ports 30000-65535 of the client must be permitted.
- Both on server and client sides: setup default gateway
Please consult with Windows online documentation for details.
If stricter firewall rules are required, it is possible to open the ports 30000-65535 and 1947 only for the "Sentinel HASP License Manager" (hasplms.exe) service (it will be installed by CHARON-VAX / CHARON-PDP11).
In case if any magneto-optical (MO) drive installed on host system is going to be used with CHARON (mapped as "\\.\PhysicalDrive<N>" to some of CHARON emulated disk controllers) the host "MediaChangeNotification" (MSN) service must be switched off manually for this drive according to the following procedure:
Type "regedit" in the search field under "Start" menu or press Windows+R and enter "regedit"; press Enter to run the found applet.
Find the "AlwaysDisableMCN" parameter in the following way:
HKEY_LOCAL_MACHINE+ SYSTEM+ CurrentControlSet+ Enum+ SCSI+ Disk&Ven_DEC&Prod_RWZ53_____(C)DEC<-This one depends on Vendor and Model of your MO drive+ 5&fd233cf&0&000500<-This one depends on hardware connection (SCSI ID of MO drive, location of SCSI HBA on the host's mainboard, etc ...)+ Device Parameters+ MediaChangeNotification+ AlwaysDisableMCN = DWORD:00000000- Change the "AlwaysDisableMCN" parameter to "1", for example: "AlwaysDisableMCN = DWORD:00000001".
- Reboot the host system.
Before installation
Login as the local system administrator ("Administrator") on the host system.
Create a special user for running CHARON-VAX / CHARON-PDP (optional). This user must have all the administrative privileges. Please consult with Windows online documentation for details.
The CHARON installation procedure will create a special group called CHARON-GRP and the current user will be automatically included to this group. Do not remove this group and do not remove any CHARON user from it, otherwise a problem with virtual memory allocation may appear on CHARON startup.
The created user may belong to some domain, but please note that in this case you have to add this user to the CHARON-GRP manually as it is described in this article and then reboot CHARON host.
Stay logged in as local system administrator ("Administrator") or log off and login as the CHARON-VAX / CHARON-PDP user having administrative privileges (if this option has been chosen).
Create a special directory for the CHARON-VAX / CHARON-PDP distribution kit and copy the provided files there.
Upgrade cases:
| From version | Action |
|---|---|
| 4.7 and below | First uninstall all CHARON products. |
| 4.8 | The version 4.9 can be installed directly.
|
Distribution preparation
Extract the content of the distribution archive to the current directory or copy the content of the provided distribution directory to the current directory.
Run the "InstallShell.exe" file:

Installation
The following description assumes this is the first installation of CHARON-VAX / CHARON-PDP on the target host. Installation of additional CHARON products later follows the same procedure.
All the following examples are given for CHARON-VAX product. Installation of CHARON-PDP/11 is the same except the name of the product.
The first dialog lists the CHARON-VAX / CHARON-PDP product:
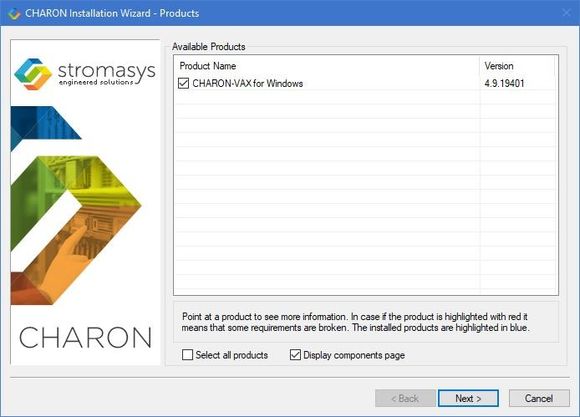
Select the CHARON-VAX product, or all products, by checking the corresponding box. Select the "Display components page" to include the products components page if you need it. Typically it is not required.
The CHARON products may be highlighted with a red color. This indicates that the CHARON host configuration does not meet CHARON requirements. To see what requirements are not met, point the mouse cursor on that product and a pop-up box with details will appear.
Press the "Next" button.
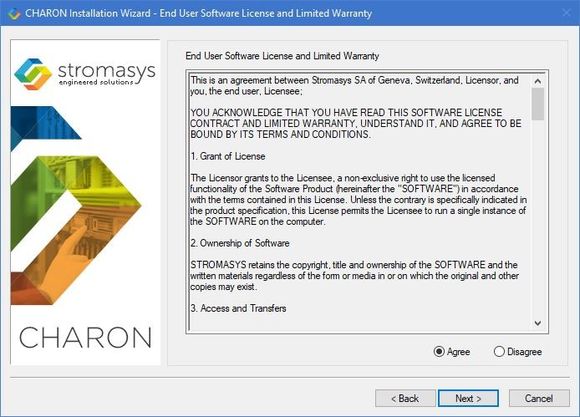
Read the license, check "Agree" if you agree and press the "Next" button.
If "Display components page" option was selected, the setup procedure will display a dialog for the CHARON-VAX product components:
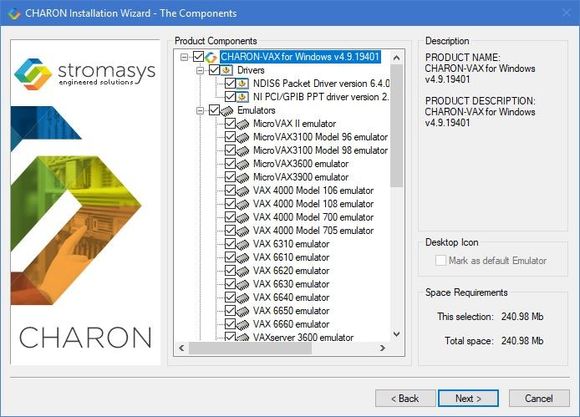
![]() It is strongly recommended to leave the selection as it is unless you clearly understand what the impact is if you uncheck some modules.
It is strongly recommended to leave the selection as it is unless you clearly understand what the impact is if you uncheck some modules.
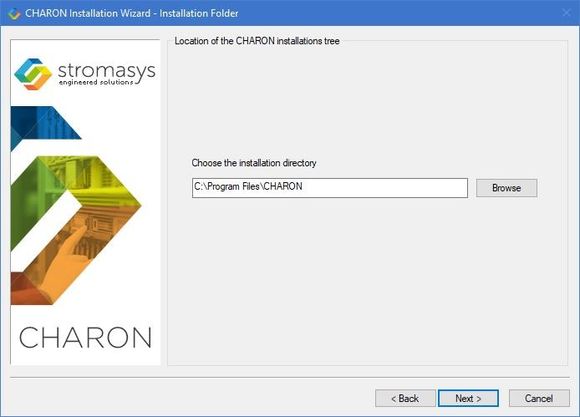
Select a directory to be used for CHARON installation or use the default. The path can either be entered manually or selected using the "Browse" button.
Once done, press the "Next" button to start the installation of the selected components.
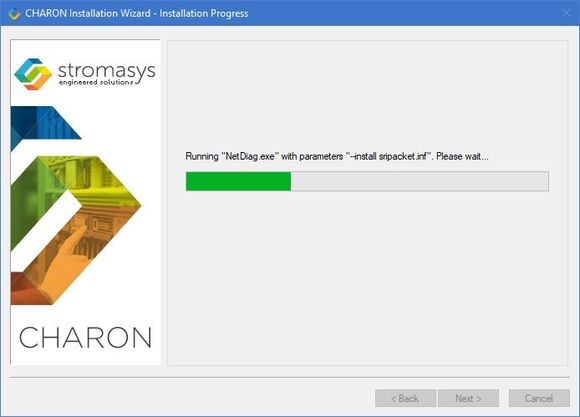
During the CHARON installation procedure, you will have to confirm the installation of the CHARON-specific network driver. Press the "Install" button:

Once the installation is done, the following dialog will be displayed:
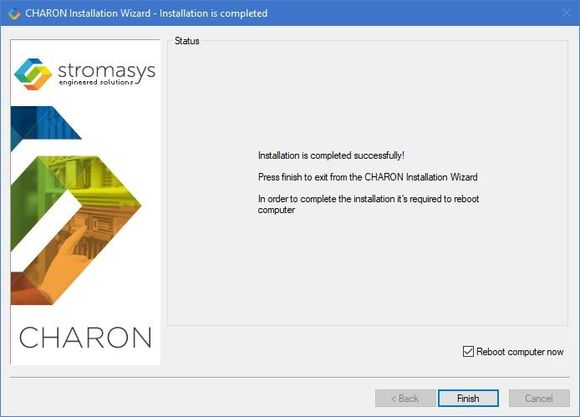
![]() It is strongly recommended to reboot the CHARON host system immediately: leave the "Reboot computer now" box checked and press the "Finish" button.
It is strongly recommended to reboot the CHARON host system immediately: leave the "Reboot computer now" box checked and press the "Finish" button.
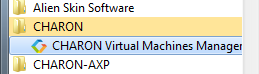
Once the host system is up again, you will notice a new shortcut, "CHARON Virtual Machines Manager", created on the desktop during the installation procedure:

The CHARON Virtual Machines Manager is an essential utility for CHARON management. CHARON installation always keeps most up-to-date version of CHARON Virtual Machines Manager provided by all the installed kits.
In case of upgrade from V4.8, update all existing CHARON Virtual Machines to make them run the latest version - otherwise they will remain at V4.8. See the following chapters for details.
The CHARON installation procedure has created the following structure under the "Start" menu:
CHARON-VAX / CHARON-PDP home directory
By default CHARON is installed in the "C:\Program Files\CHARON" directory. It has the following subdirectories:
Directory | Description |
Build_XXX\x86 (and Build_XXX\x64 on x64 systems) | Contains product executables and libraries |
Drivers | Contains the CHARON drivers |
Chapi | Contains CHARON API files used for creating new emulated devices |
InstallShell | Contains the CHARON installation procedure executables |
Logs | Contains the CHARON installation log |
| Redistributables | Contains the redistributables needed for CHARON running (already installed, except the license alert script) |
| Virtual Machines Manager | Contains the most up-to-date version of CHARON Virtual Machines Manager |
| Virtual Machine Templates | Contains templates for creating CHARON Virtual Machines |
| Virtual Machines | Contains the CHARON Virtual Machines |
| Virtual Disk Images | Contains the CHARON virtual disk images, for example "charoncp012" and "idle_vms_pkg_v3.0" |
The "Virtual Machine Templates" directory contains template configuration files to build CHARON Virtual Machine using the CHARON Virtual Machines Manager. We will focus our attention on this subject in the next chapter.
License installation
Regular HASP USB dongle
If the CHARON license is stored on a regular USB dongle, just connect it to the host USB port.
If the CHARON host is accessed remotely, please note that the contents of a regular HASP license cannot be displayed using RDP. ILO or iDRAC or some other console-capable program must be used.
Network HASP USB dongle
If the CHARON license is a network license (red USB dongle), it is possible either to connect it to the host USB port (to use it locally and provide it to other hosts on the local network at the same time) or to install it on a local network "license server" for remote access from this particular host.
If a remote license server is to be used:
- Copy the file "
hasp_install\haspdinst.zip" from the CHARON distribution to any directory on the server, for example "C:\Temp". - Extract the content of this archive to the same directory.
- Login as "Administrator" on the server and open "
cmd.exe" from the "Start" menu. - Switch to that directory.
Install the extracted file.
Example:
...> cd c:\tempc:\temp> haspdinst.exe -fr -kp -nomsgc:\temp> haspdinst.exe -install -cm- Copy the file "
hasp_install\hasplib.zip" from the CHARON distribution to any directory on the server, for example "C:\Temp". - Extract the contents of this archive to the same directory.
- Copy the file "
haspvlib_68704.dll" to "C:\Program Files (x86)\Common Files\Aladdin Shared\HASP" (in case of x64 host) or "C:\Program Files\Common Files\Aladdin Shared\HASP" (in case of x86 host) - Connect the network HASP dongle to the server USB port.
Network HASP (red dongles) licenses have no restrictions with respect to remote access.
Software license
If the CHARON license is a software license (SL), it is installed on the host using the following procedure:
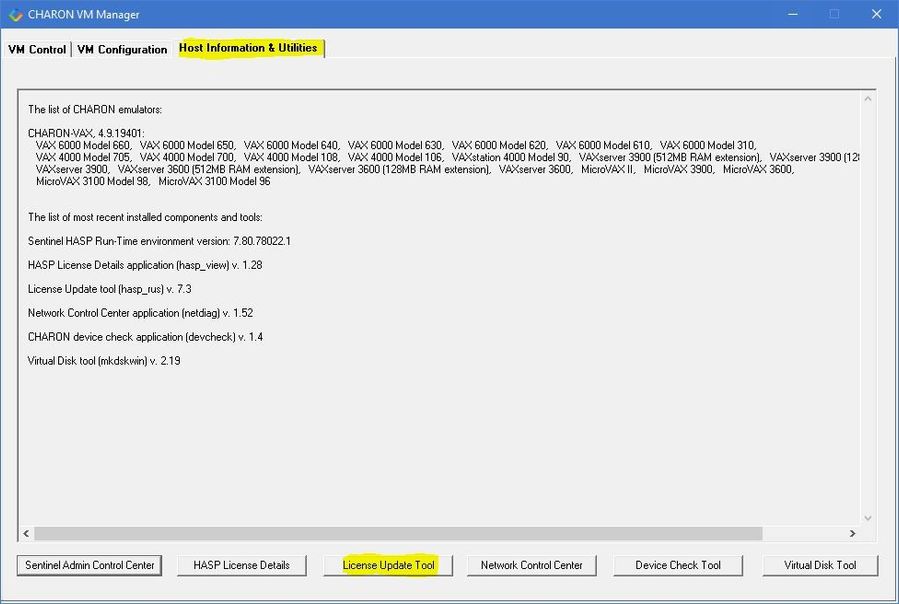
Double click the "CHARON Virtual Machines Manager" icon on the desktop or select this utility in the tray menu; select the "Host Information and Utilities" section and press the "License Update Tool" button:
The following default dialog window will appear: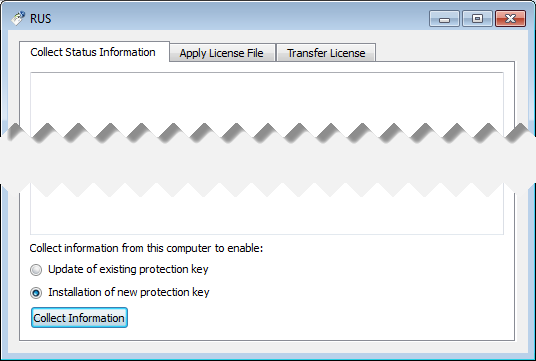
If you're installing a "Provisional" (demo) license, jump to step 5
Ensure no license dongle is connected, select the "Installation of new protection key" radio-box and press the "Collect Information" button. The following window will appear:
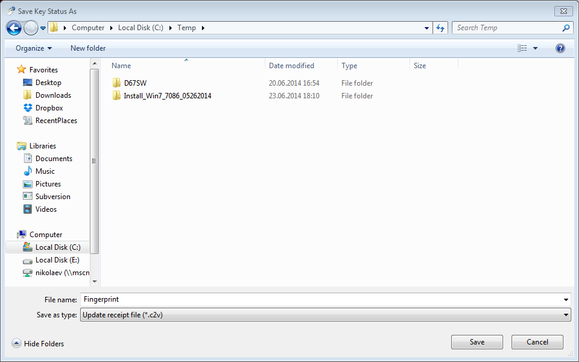
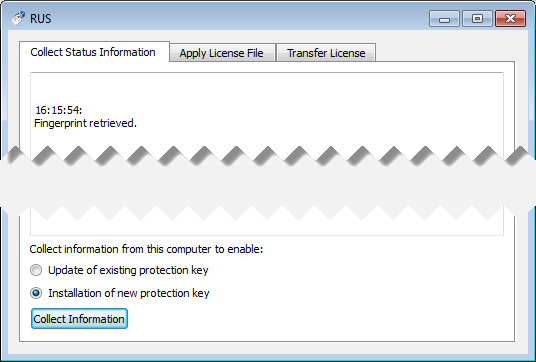
Specify the directory and name of the system "fingerprint" file to be created then press the "Save" button.- The "License Update Service" will save the fingerprint file under the given name and report the status:
- Send the resulting file to STROMASYS. In return STROMASYS will provide you with a ".v2c" file, for example "Your License.v2c".
Copy the received v2c file to CHARON host in the folder of your choice and select the "Apply License File" tab:
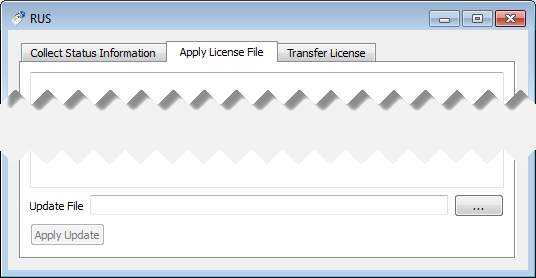
- Press the "..." button and browse for the received v2c file.
Example: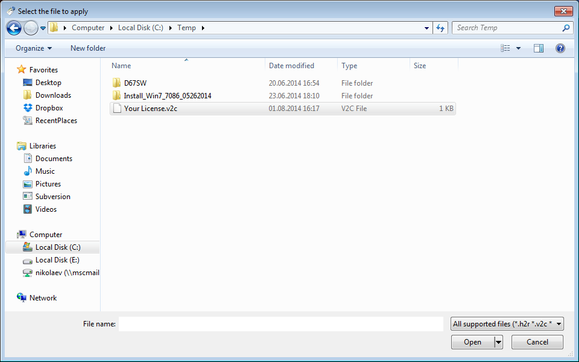
Press the "Open" button to apply the license. - From the "CHARON Virtual Machines Manager" utility (see above) select the "Host Information and Utilities" section and press the "Sentinel Admin Control Center" button or (optionally) invoke the system default web browser and enter the URL http://localhost:1947 to display the "Sentinel Admin Control Center" (ACC) web interface. This interface allows you to view and manage the CHARON licenses.
- Ensure that the software license is now visible in the "Sentinel Keys" section of the ACC.
Software licenses are always network licenses. Hence, they have no restrictions with respect to being displayed or accessed via a remote connection.
License validity verification
Check the CHARON license validity by invoking the "Charon License Details" utility to make sure that the CHARON license is visible and is correct. Double click the "CHARON Virtual Machines Manager" icon on the desktop or select this utility in the tray menu; select the "Host Information and Utilities" section and press the "HASP License Details" button:
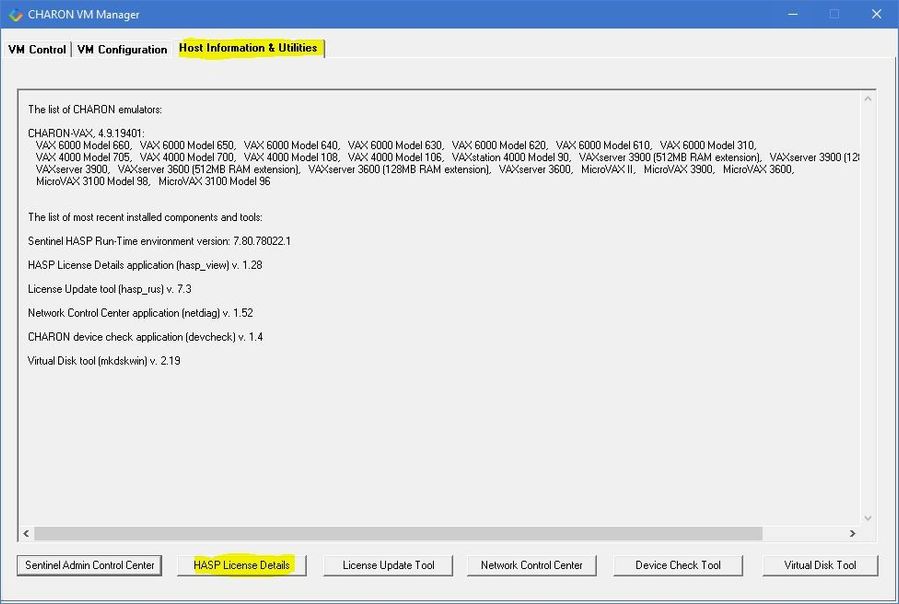
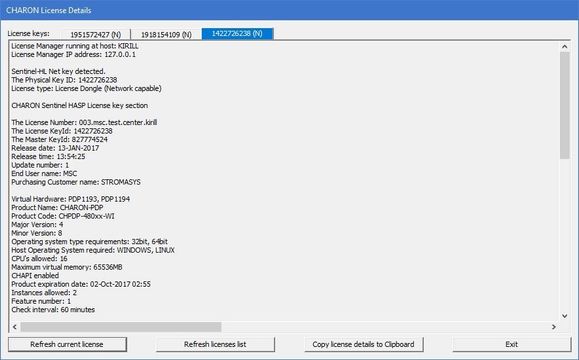
- Verify the the license content is displayed correctly and no error message is shown
- Verify the content of the license looks correct. Check for example the license number, the major and minor versions, the minimum and maximum build numbers, the CHARON-AXP products and allowed hardware (CHARON-AXP models). More details on the license content can be found in the CHARON-VAX / CHARON-PDP Licensing chapter of this Guide.
Troubleshooting
If the CHARON license content cannot be displayed by the "CHARON License Details" utility or it is incorrect, check that the license is available and correctly used:
- From the "CHARON Virtual Machines Manager" utility (see above) select the "Host Information and Utilities" section and press the "Sentinel Admin Control Center" button or (optionally) invoke the system default web browser and enter the URL http://localhost:1947 to display the "Sentinel Admin Control Center" (ACC) web interface.
- Click on the "Sentinel Keys" link to open up the "Sentinel Keys Section" page
- Make sure that one and only one CHARON HASP or SL license is present.
Problem | Action |
|---|---|
| No license is displayed | Make sure that all the recommendations above about remote access to the host are fulfilled (if remote access takes place) and the HASP USB key is not broken and its LED indicator is lit (meaning that it is used by the host). |
| Only one License key / SL is seen and its content is incorrect | Contact STROMASYS to request a new license update. |
| Several License keys / SLs are displayed | Remove all of them except the one provided by STROMASYS for the installed version of CHARON. |
Removing licenses can be done by physical disconnection of the corresponding USB HASP keys from the CHARON host and physical disconnection of the network HASP keys from all hosts on a local network (or by disabling remote access to network licenses from the CHARON host - see detailed explanation below).
Software licenses can also be uninstalled using the method, described in the "Removing CHARON-VAX Software Licenses" chapter of this Guide.
For license servers accessible only via non-broadcast search it is also possible to disable access to network licenses if only a local license is to be used: Click on the "Configuration" link to open the "Configuration for Sentinel Manager" page.
Uncheck the "Allow Access to Remote Licenses" checkbox from the "Access to Remote License Managers" tab then press the "Submit" button to apply changes.
Starting with Charon-AXP/VAX 4.9 for Linux and Charon-AXP/VAX version 4.8 for Windows the Charon emulator products do not follow the settings in the Sentinel ACC with respect to querying remote license servers and network visibility. They perform a broadcast search for network licenses even if this has been disabled in the Sentinel ACC. If this behavior has to be prevented for specific reasons, the network access of the system has to be temporarily restricted or disabled, for example by blocking the relevant traffic in a firewall. Another possibility would be to block access to the network license at the license server side.
Note that such methods can negatively impact other functions of the system or, in the case of blocking access to a network license on the server, even the functions on other license clients.
It is possible to have several licenses available to CHARON-VAX at the same time. In this case you have to specify in the CHARON-VAX configuration file the license key ids to be used.
Example:
set session license_key_id="1877752571,354850588" |
Network configuration
If the CHARON virtual machine needs access to the network, one or more dedicated network interfaces cleared from any other protocols including TCP/IP will have to be defined.
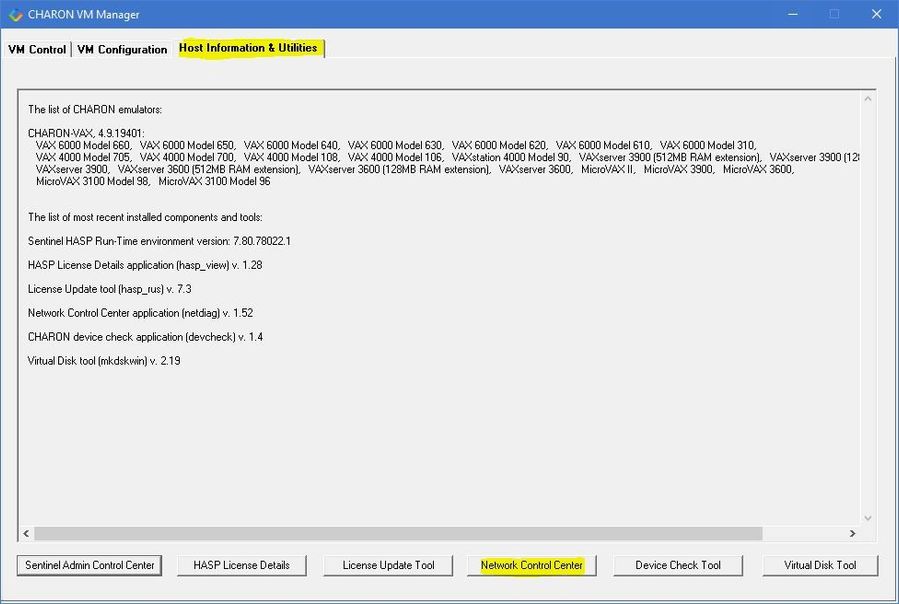
Configuring the network is done with the "Network Control Center" (NCC) utility. Double click the "CHARON Virtual Machines Manager" icon on the desktop or select this utility in the tray menu; select the "Host Information and Utilities" section and press the "Network Control Center" button:
In the appearing dialog, select "Configure NIC":
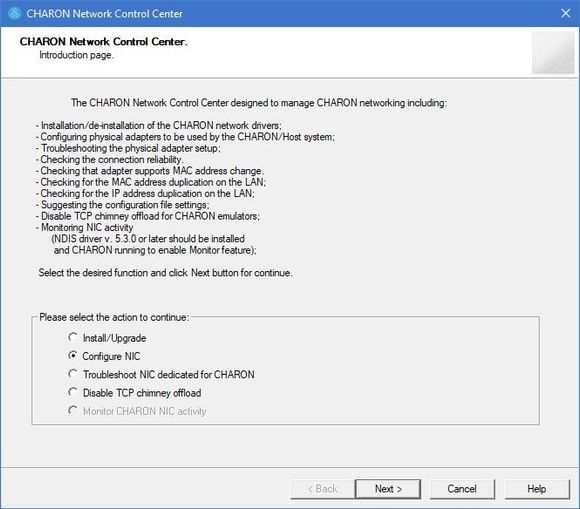
Press the "Next" button, the following dialog will appear:
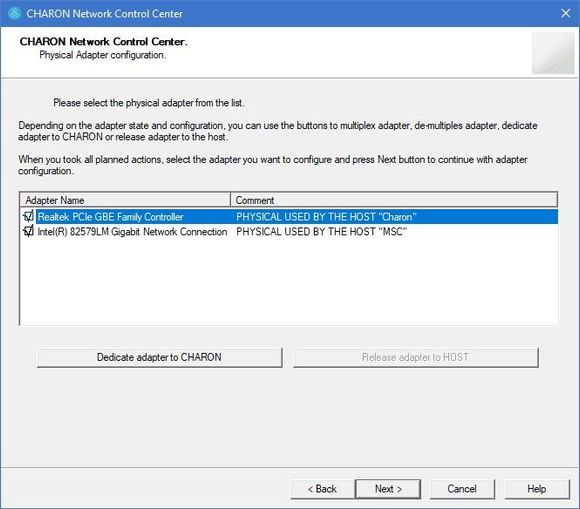
Select the interface to be dedicated to CHARON (in our example it is Realtek PCIe GBE Family Controller named "Charon") and press the "Dedicate adapter to CHARON" button.
CHARON supports VLAN adapters. If you are going to use them, proceed with their installation and configuration according to the network adapter vendor User's Guide and then select the VLAN interface in the dialog shown above, the same as you do for a regular network interface. There is no difference in configuring a regular network adapter and a VLAN one, so all the provided instructions are fully applicable for VLAN adapters as well.
After few seconds the chosen interface will be assigned to CHARON:
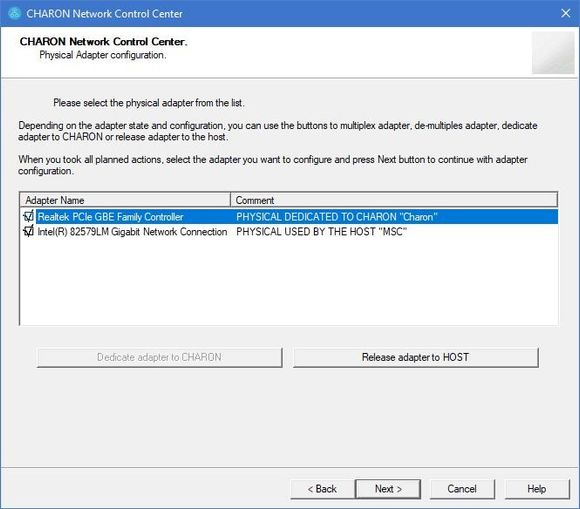
![]() It is possible to release the interface back to the CHARON host by selecting the target interface and pressing the "Release adapter to HOST" button.
It is possible to release the interface back to the CHARON host by selecting the target interface and pressing the "Release adapter to HOST" button.
The next step displays the text to be included in the CHARON configuration file for the interface dedicated to CHARON. Select the target interface and press the "Next" button. The following dialog will appear:
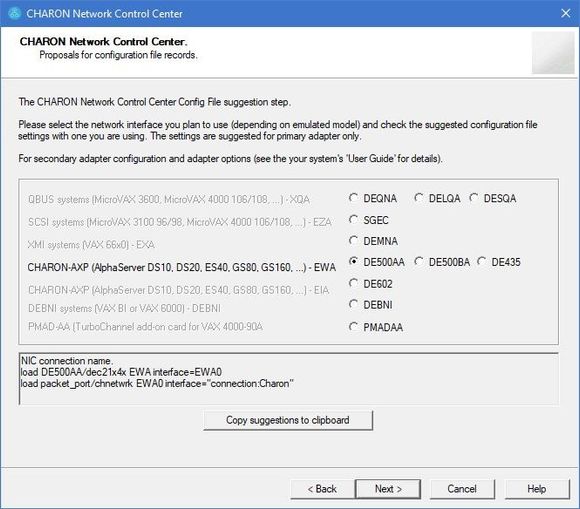
Selecting the target emulated network interface displays the configuration lines specific for the selected CHARON host network interface. Press the "Copy suggestions to clipboard" button to copy the suggested configuration lines. They can be pasted into the CHARON-VAX / CHARON-PDP configuration file during the next editing session by pressing "Ctrl-V".
Press the the "Cancel" button to exit from the "Network Control Center" utility.
Restart the "Network Control Center" utility again and select "Disable TCP chimney offload for CHARON":

Press the "Next" button to apply the "offload" parameters settings.
Press the "Cancel" button to exit from the "Network Control Center" utility.
![]() When the NIC properties are configured in Windows, a reboot of the CHARON host is required for the changes, specifically "offload" parameters, to take effect.
When the NIC properties are configured in Windows, a reboot of the CHARON host is required for the changes, specifically "offload" parameters, to take effect.
After installation
If you plan to use the local system administrator account ("Administrator") or the CHARON-VAX / CHARON-PDP user having administrative privileges, no other actions are required.
If the CHARON-VAX / CHARON-PDP user belongs to some domain, you have to add this user to the CHARON-GRP group as it is described in this article and then reboot the CHARON host.
Otherwise it is possible to use a standard account (both local and domain) for running CHARON-VAX / CHARON-PDP:
Login as the local system administrator ("Administrator") on the host system.
Create a special user for running CHARON-VAX / CHARON-PDP. This user must have administrative or standard privileges (in this case login as Administrator for manging NDIS drivers and running NCC utility). Please consult with Windows online documentation for details.
Add this user to the CHARON-GRP group as it is described in this article and then reboot CHARON host.
Login as the created user.
© Stromasys, 1999-2024 - All the information is provided on the best effort basis, and might be changed anytime without notice. Information provided does not mean Stromasys commitment to any features described.